I was out of town recently and got a call from my wife to tell me there was water dripping from the light fixture over the kitchen sink. Our master bathroom sink is directly above and everything was dry there. I instantly thought back to another leak we had a few years ago caused by snow in the attic. However, the situation was a bit different (main floor vs. top floor, no recent snow) suggesting a different cause.
When I got home later that evening the first thing I did was to remove the light fixture which did not reveal much of anything. I reached out to a friend that is a plumber to ask his advice. He said it might be just a pinhole in which case I would be able to fix it with a SharkBite Push Coupling. I just need to cut into the ceiling drywall to investigate.
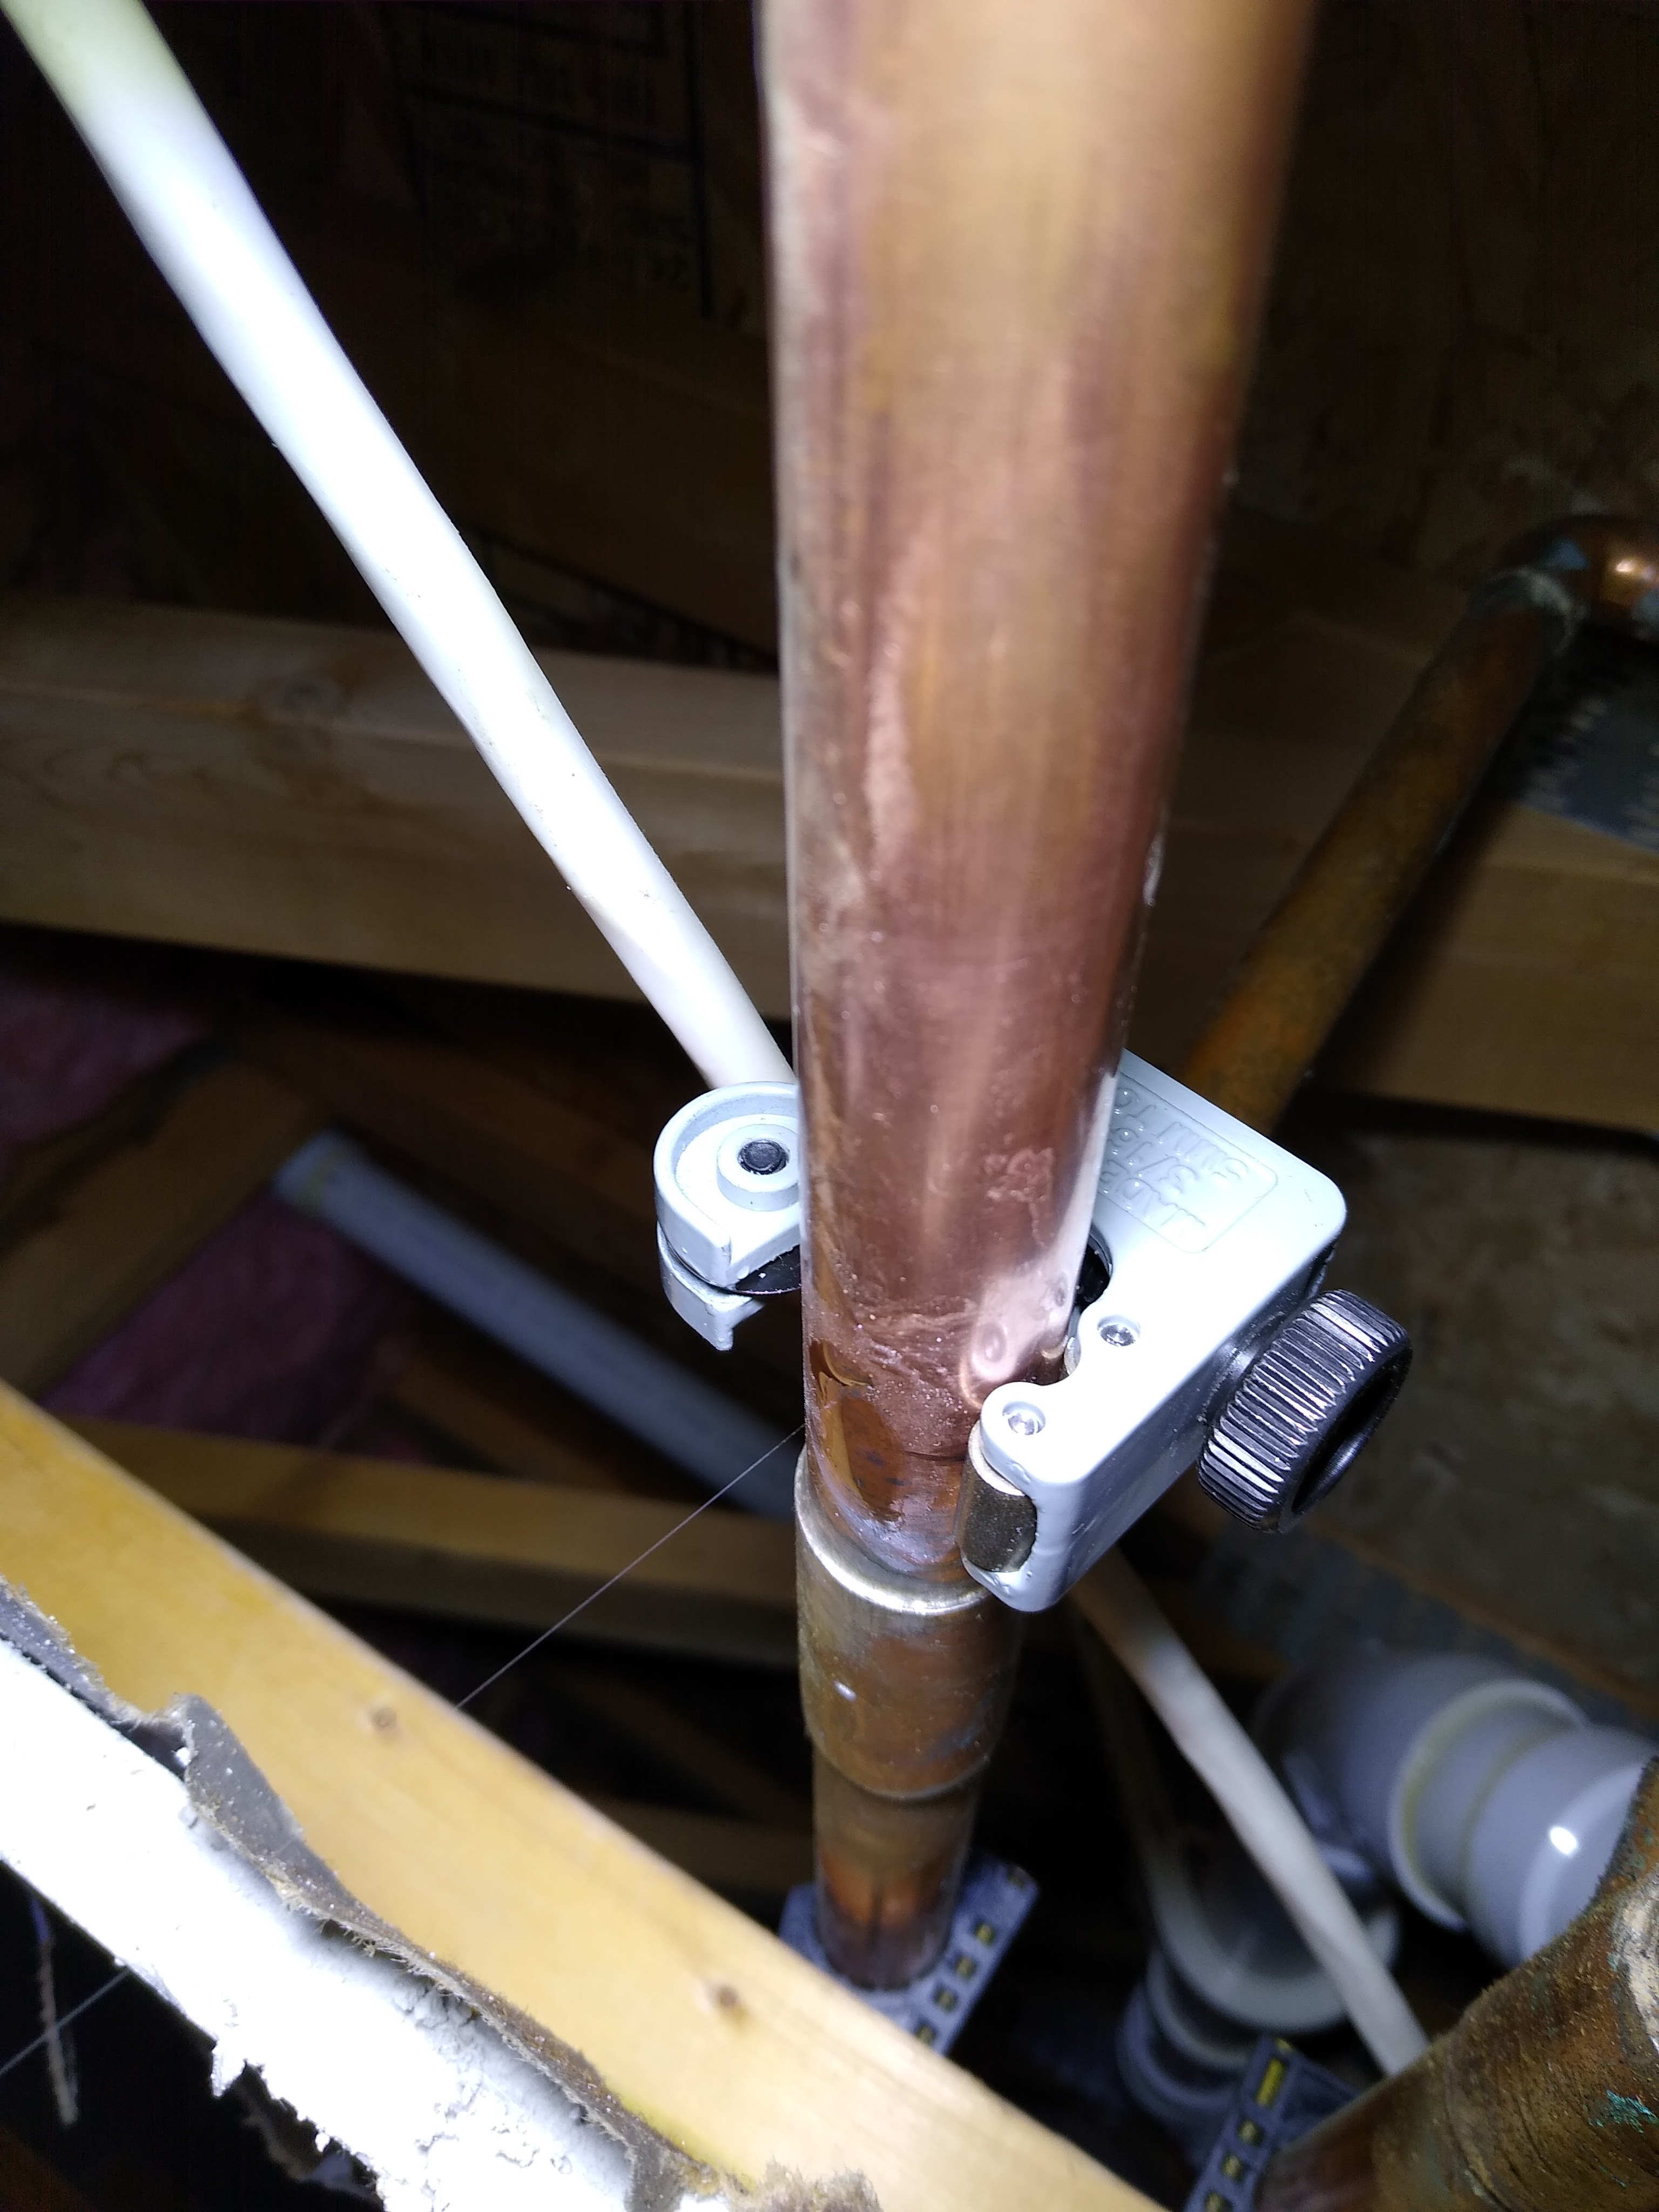
I cut a large enough hole in the drywall so that I could get my head up there and look around. At first I could not determine the source of the leak. I kept looking and felt it before I saw it. After shutting the water off I used my mini pipe cutter to split the pipe directly on the pinhole.
Installing the SharkBite coupling ($10) was pretty straightforward. It was a little challenging to get the pipe separated enough to insert the coupling. Just needed a few extra grunts and groans. Good as new.
Now to fix the drywall. I think I will pay a professional to do that.
Update – I did hire someone to fix the drywall. I just installed a new light fixture tonight. Now to paint the ceiling. That might be a task to hire someone for as well.
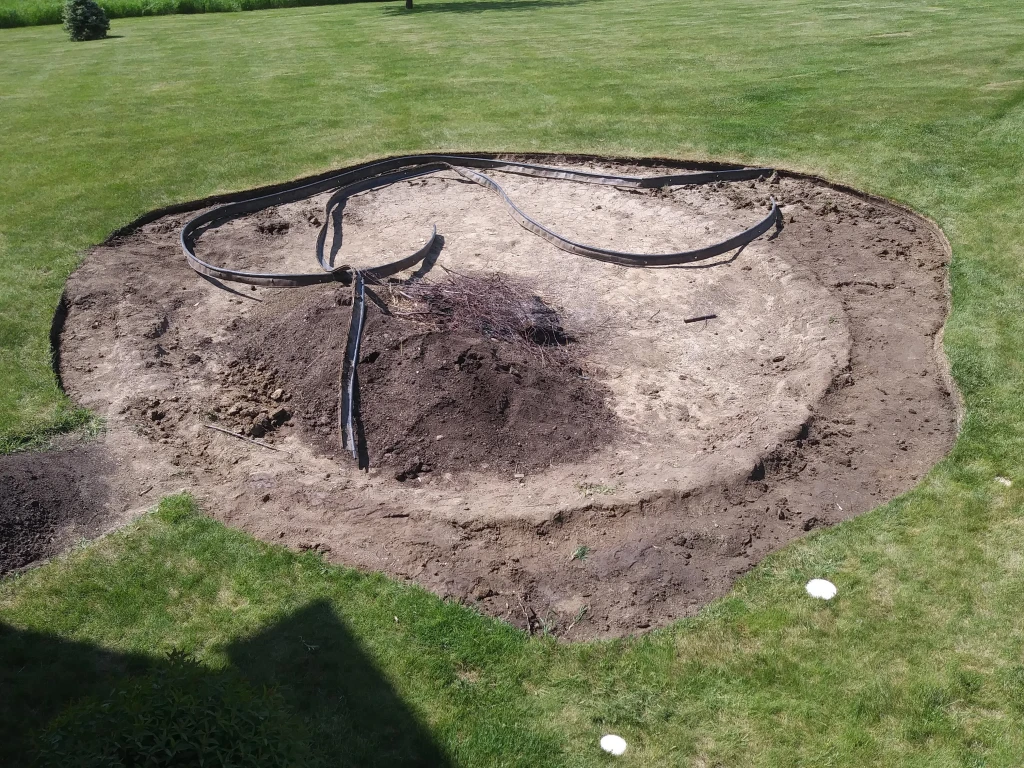
We have had an in ground fire pit for years. It had served us well, but whenever we would get more than an inch of rain it would flood. This photo is from a rain of a couple of inches. Clearly we had an issue. Also, over the years the blocks in the lower right of the photo had tipped such that the top layer was actually sliding off.
Rather than fixing the drainage and tipping blocks we decided we wanted to just remove it, plant grass, and relocate our fire pit elsewhere in the yard. Fortunately, a friend and his son offered to assist us which inspired my sons to help as well. In two separate sessions the 6 of us got the rock cleared.
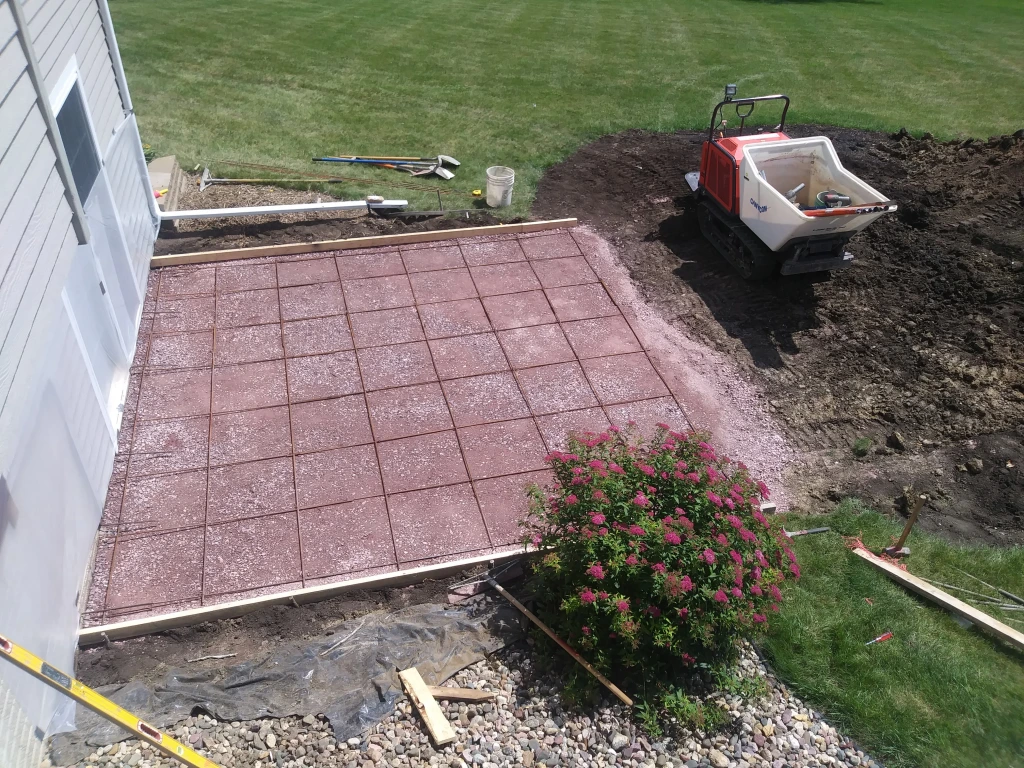
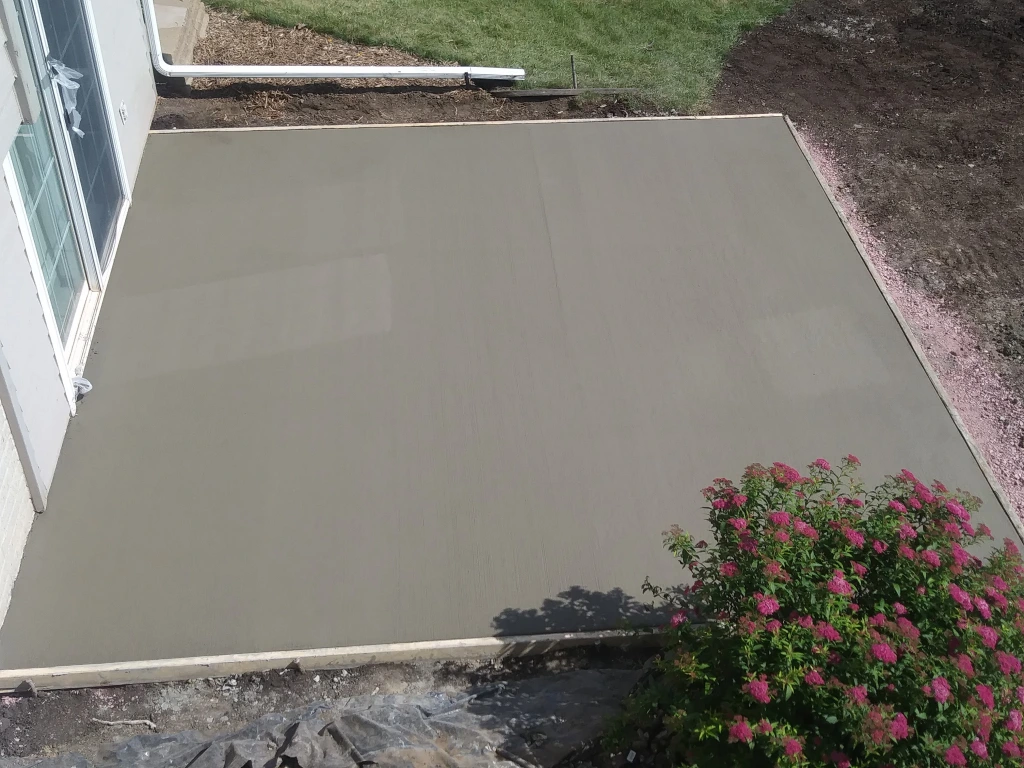
Since we were working on removing the fire pit we thought it would be a good time to replace our 12′ x 8′ patio which we had been thinking of doing anyway. It was cracked in both directions and we wanted to go with a bigger 14′ x 14′ slab. I broke up the existing slab with a sledgehammer and loaded the chunks into a dump trailer borrowed from a neighbor.
There was no rebar or wire mesh in the concrete for reinforcement. That certainly made it easier to break up, but that is also likely why it had cracked. That and the fact the thickness varied from 4″ down to just 1″ which is hard to explain. Too much beer?
Off to the landfill. The fact we had use of a dump trailer was a real blessing for this project.
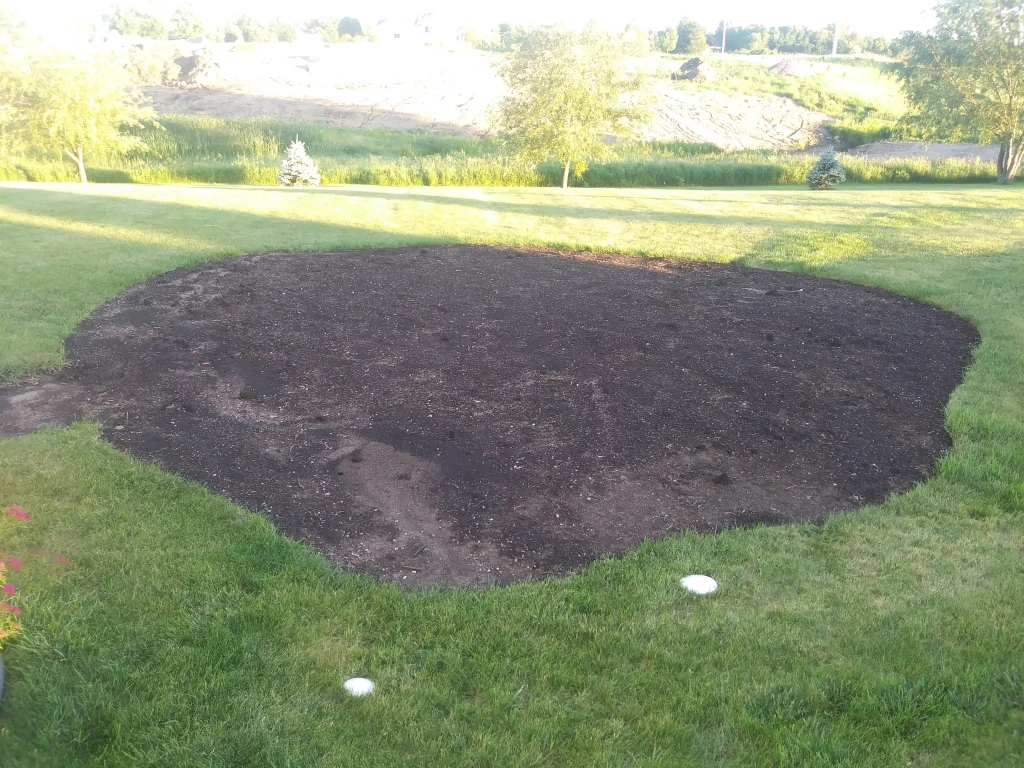
Our plan to fill in the former fire pit area and bring it up to grade was to use compost. You can get it free at the landfill if you load it yourself and $20/ton if you have them load. One payloader scoop filled the trailer with 3.25 tons. The $65 was definitely worth avoiding at least 2 hours of shoveling.
Unfortunately while driving onto the scale to weigh my load of compost I clipped the edge of something and blew out a tire on the trailer and bent the wheel beyond repair.
We were able to limp off the scale with just one tire on that side. The landfill maintenance supervisor brought us a heavy duty floor jack in order to get the tire off. We left the trailer at the landfill and went back into town to buy a new wheel and tire. It only took about 90 minutes to be back on the road home with our load of compost. We ended up making two more trips to the landfill for a total of about 8.5 tons of compost
We opted not to do the concrete ourselves and hire a contractor instead for just over $1700. I am very glad we did. For another $200 they would have removed the old slab and hauled it away. In retrospect, that would have been a great deal! They made quick work of it doing the majority of the job in one day with a bit of cleanup the next morning.
As you can see in the photo we opted for rebar reinforcement rather than wire mesh. They even drilled into the foundation of the house to tie the rebar from the patio into the house.
After the concrete work was done we planted grass and watered it often. It came in pretty well. I may need to overseed it next spring. We opted for a portable fire pit we picked up for $100 rather than digging a hole in the ground somewhere else in the yard.
We are doing some landscaping that is going to require a significant amount of dirt to properly grade and drain. Earlier this week we jumped on an offer of free dirt posted online. This was the second time we had done this in as many weeks.
My 2004 Toyota Tundra’s box is 6′ long, 5′ wide, and 18″ deep. By my calculations that is 45 cubic feet (1.67 cubic yards). There are a lot of variables (soil type, moisture, loose vs. packed), but 1 cubic yard of soil weighs right around 2,000 pounds. The first load filled the box about half full which would be a bit less than 1,700 pounds. For the most recent load we filled the box about 3/4 full, 1.25 cubic yards weighing in somewhere around 2,500 pounds.
We made it home just fine, but that weight proved to be too much. The next morning I noticed fluid on the garage floor beneath the rear axle of my pickup. The shocks had failed.
My pickup has 190,000 miles on it. I have had it for the last 50,000 miles. I have no idea how many miles those shocks had. I had never replaced them. So it was probably about time anyway. I picked up these Monroe OESpectrums for $125 at a local auto parts store.
They did not look like they would be too difficult to replace. Just a couple of bolts, rights? I searched up a video to make sure I was not overlooking anything. While this video was very informative it was not encouraging that they had to use a cutting torch to get their old shocks off.
I was not able to turn the nuts off the top off either of the shocks. I have an angle grinder and a Dremel, but there was not enough room for either. A reciprocating saw would have been perfect.
Unfortunately, I do not have one of those. Or a cutting torch. The only tool I have that would work in this situation is a hacksaw. It did the job, but was quite difficult.
Once I had them out, installation was easy. I will try to keep payloads under a ton in the future.
I had built a laptop treadmill desk a few years ago to be used in my office workout room. I made it height and tilt adjustable to accommodate various people. I switched jobs so I brought it home since it worked on the treadmill I had at the time. However, that treadmill died and we didn’t get another one for over a year. So I sold that platform because I had no use for it at the time.
Lately I have been trying to walk on my treadmill more. And I recently got a laptop as my primary computer for my job. I decided it was time for another laptop treadmill desk.
This time I went for a simpler design because it would be just me using it at home. As usual my goal was to build this with materials I already had. I took some measurements and headed out to the garage. I needed something at least 3′ long. I soon found a piece of 1″ x 8″ that was 6′ long which I had saved from our refreshing our fireplace. Perfect.
I ripped it down to 6″ wide and cut it in half lengthwise. I then used my biscuit joiner to cut some biscuit slots in the ripped edges and glued them together to yield a board 12″ wide and 3′ long. To increase the strength and stability I had some drawer rails from an old metal desk that I was planning to attach to the underside. I also needed to have some sort of stop on the bottom to keep the board from moving sideways too much. I wanted to try and use some odd triangular hardwood (picked up from a curb alert) with a groove the whole length, but I wasn’t sure how I was going to affix it to the board. Sure I could have used screws down through the top, but that wouldn’t look nice.
I noticed my drawer rail just might fit the groove. Like a glove. I screwed the rail to the bottom of the board the appropriate distance from the edge to fit between the treadmill arms. Then with some some persuasion (a hammer) I slid the hardwood onto the rail; no screws or glue required.
The top of the board was pre-finished since it was from our fireplace mantel. This project took me about 2 hours and cost me nothing. I am really happy with how it turned out.
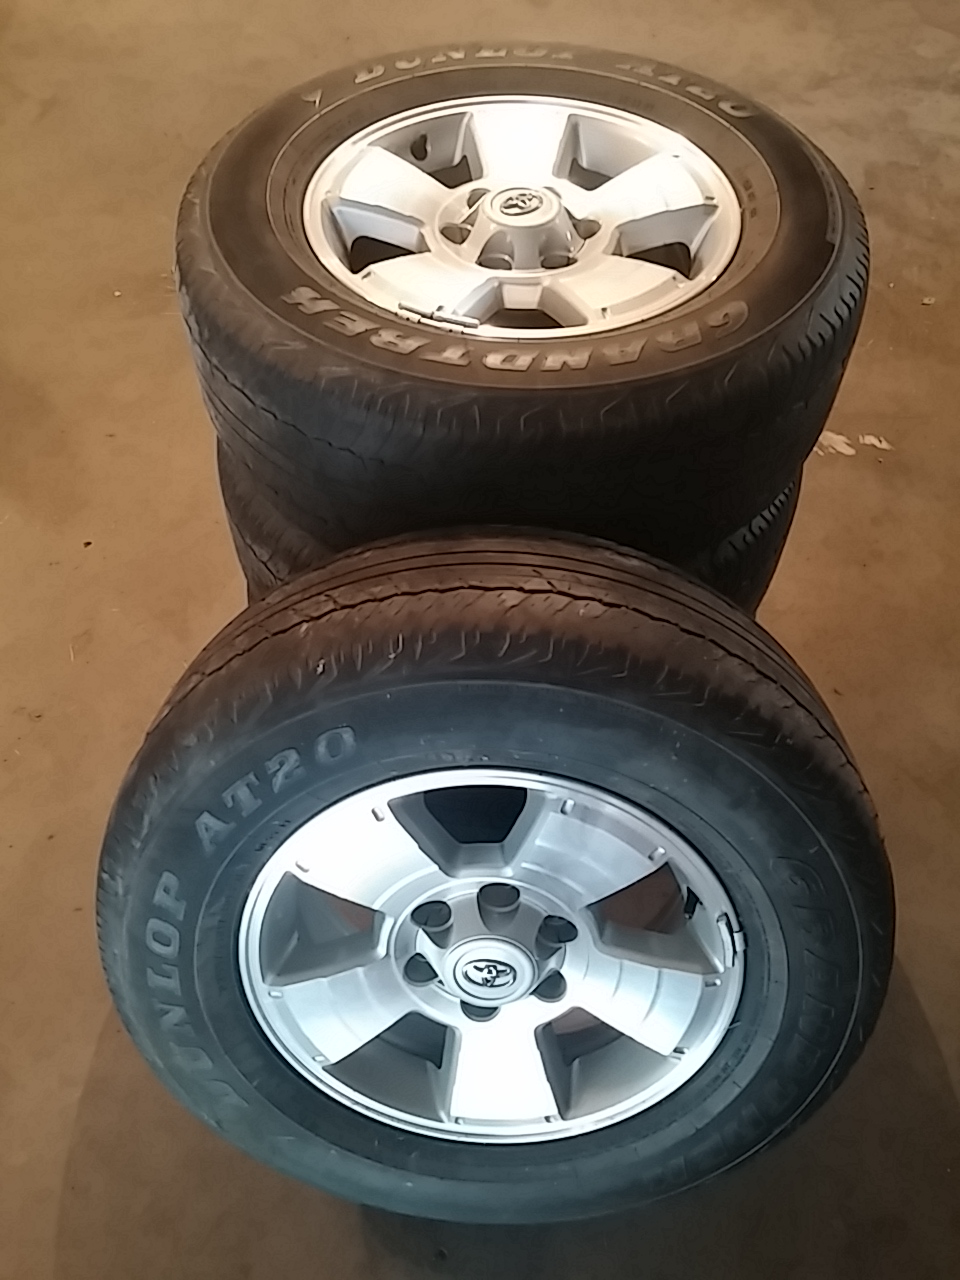
When I got my 2004 Toyota Tundra almost four years ago the alloy wheels were already in tough shape with the outer coating flaking off all of them. And over the years it got progressively worse.
I started researching what a replacement set of wheels would cost right away. I was able to find them on-line new or refurbished for anywhere from $100 to $150 per wheel. That was far more than I wanted to spend so I quit looking.
Every once in a while I would look on Craigslist thinking maybe I could get a better deal there. Just over a year ago I finally found a set that was within my price range, $200. The tires on them had hardly any tread left, but that was not a concern. I offered $160 and the seller accepted. The only problem was they were 300 miles away.
I called a friend whom I knew traveled to that area occasionally and asked him if he would be able to get them up for me. As it turned out, he was driving in that direction when I called. He got some cash, stopped at the seller’s house that afternoon, and picked them up. Did I mention he is an awesome friend? He stored them until we were able to meet up a few months later. I paid him $40 for his trouble.
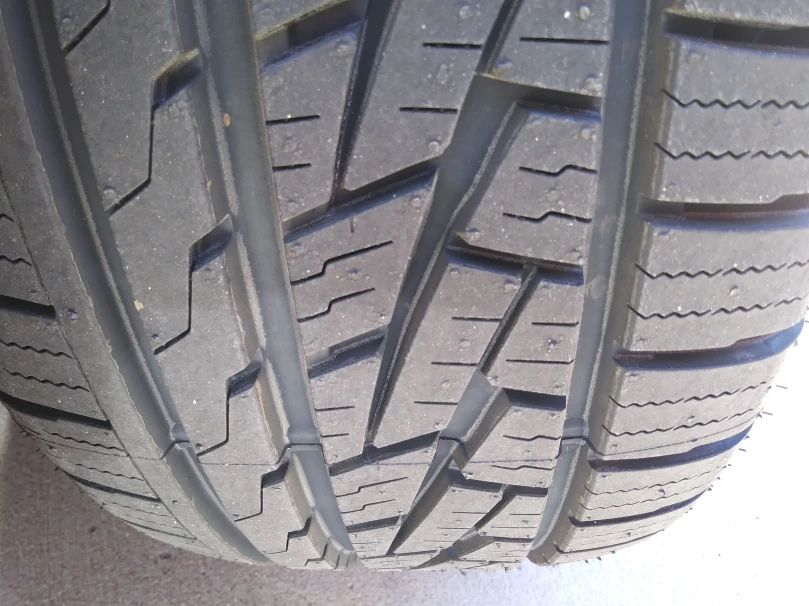
I wasn’t quite ready to put new tires on my truck so I put the wheels up in the attic of my garage for almost a year. Last week I finally decided it was time. I went with the Firestone Destination LE 2 for the tires. I am very happy with the result with respect to how they look and the good deal they were.
The rear brakes on my 2005 Honda Pilot were beginning to squeak occasionally when stopping. I checked my maintenance records and discovered it had been 5 years since I had replaced them. Time to do it again.
In my opinion, this is one of the easiest DIY car maintenance tasks you can do. A c-clamp to compress the brake pistons will make things a lot easier. Other than that, standard shop tools will suffice.
If the surface of the rotors (the part the pads squeeze to stop your vehicle) are not smooth you should get them turned by a brake repair shop; if they are in really bad condition or have been turned numerous times you should just get new rotors. If you have drum brakes with shoes instead of disc brakes with pads replacing the shoes is a little harder and is made easier with some specialty tools, but it can be done as I did on my pickup a couple years ago.
The cost of this maintenance was just under $95 for new brake pads for the entire vehicle. It took me about 2 hours to complete the job. If I had taken it to a shop the bill would have been between approximately $250. Definitely a worthwhile Saturday afternoon for me.
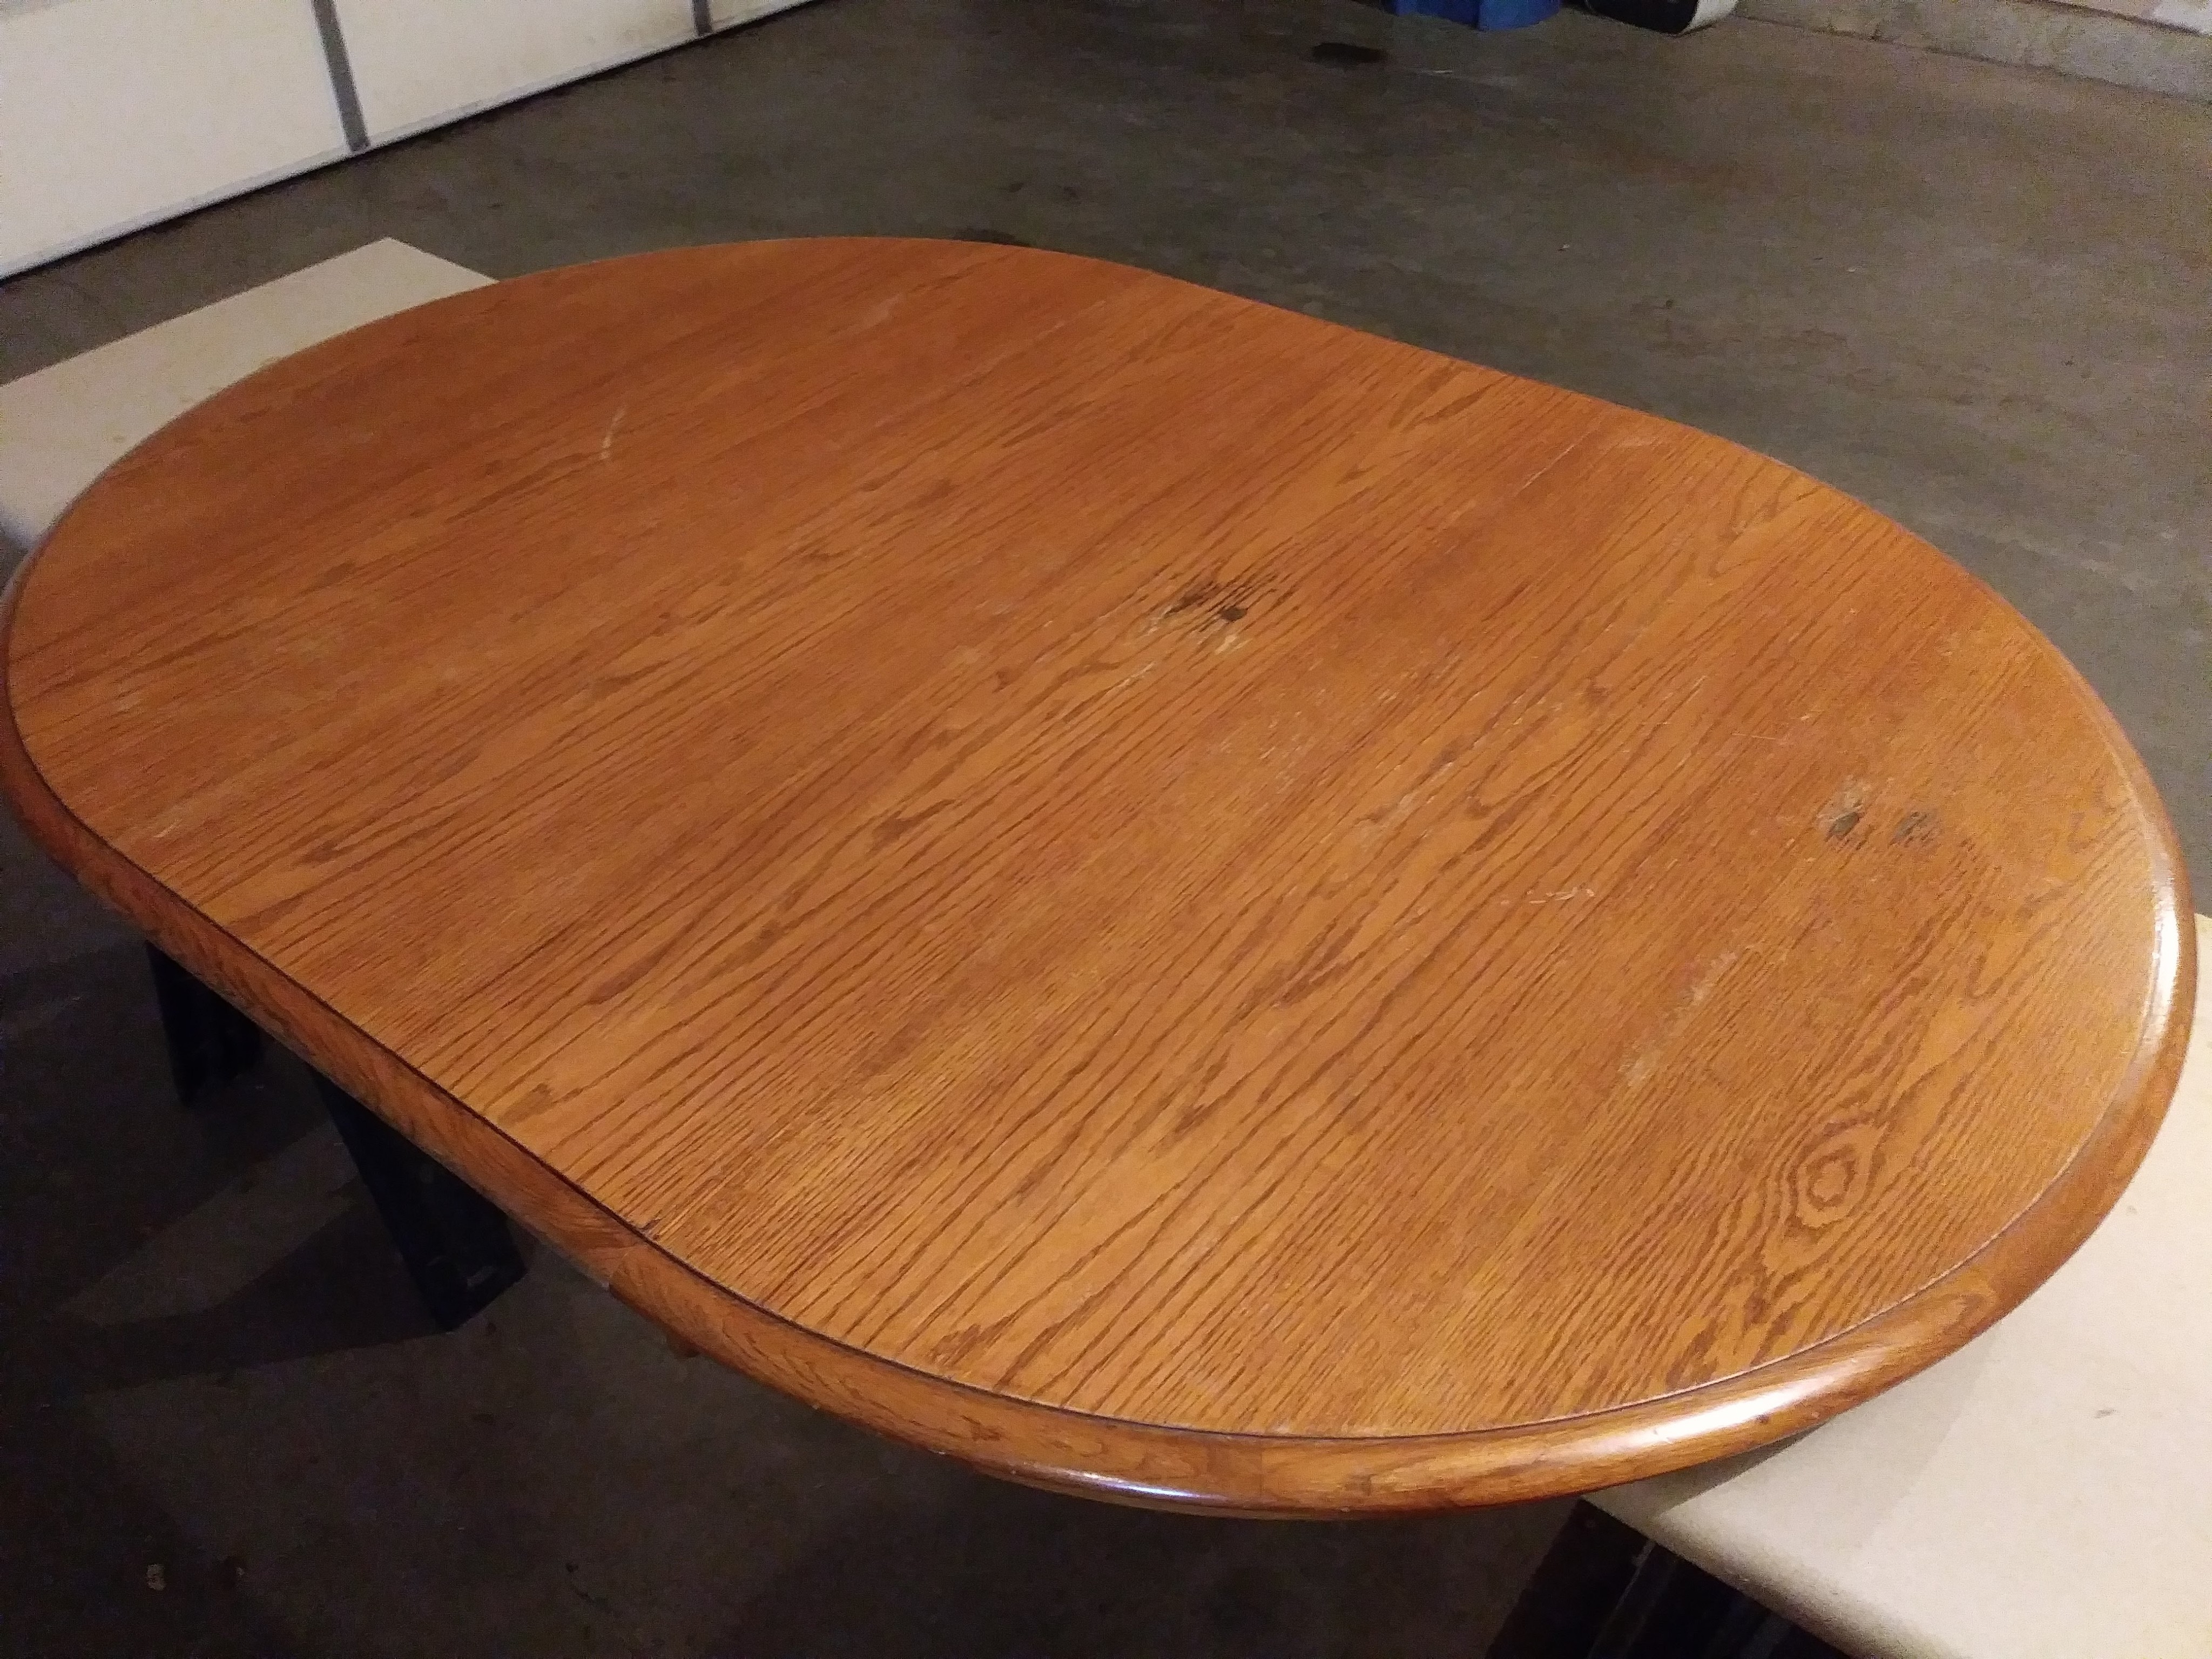
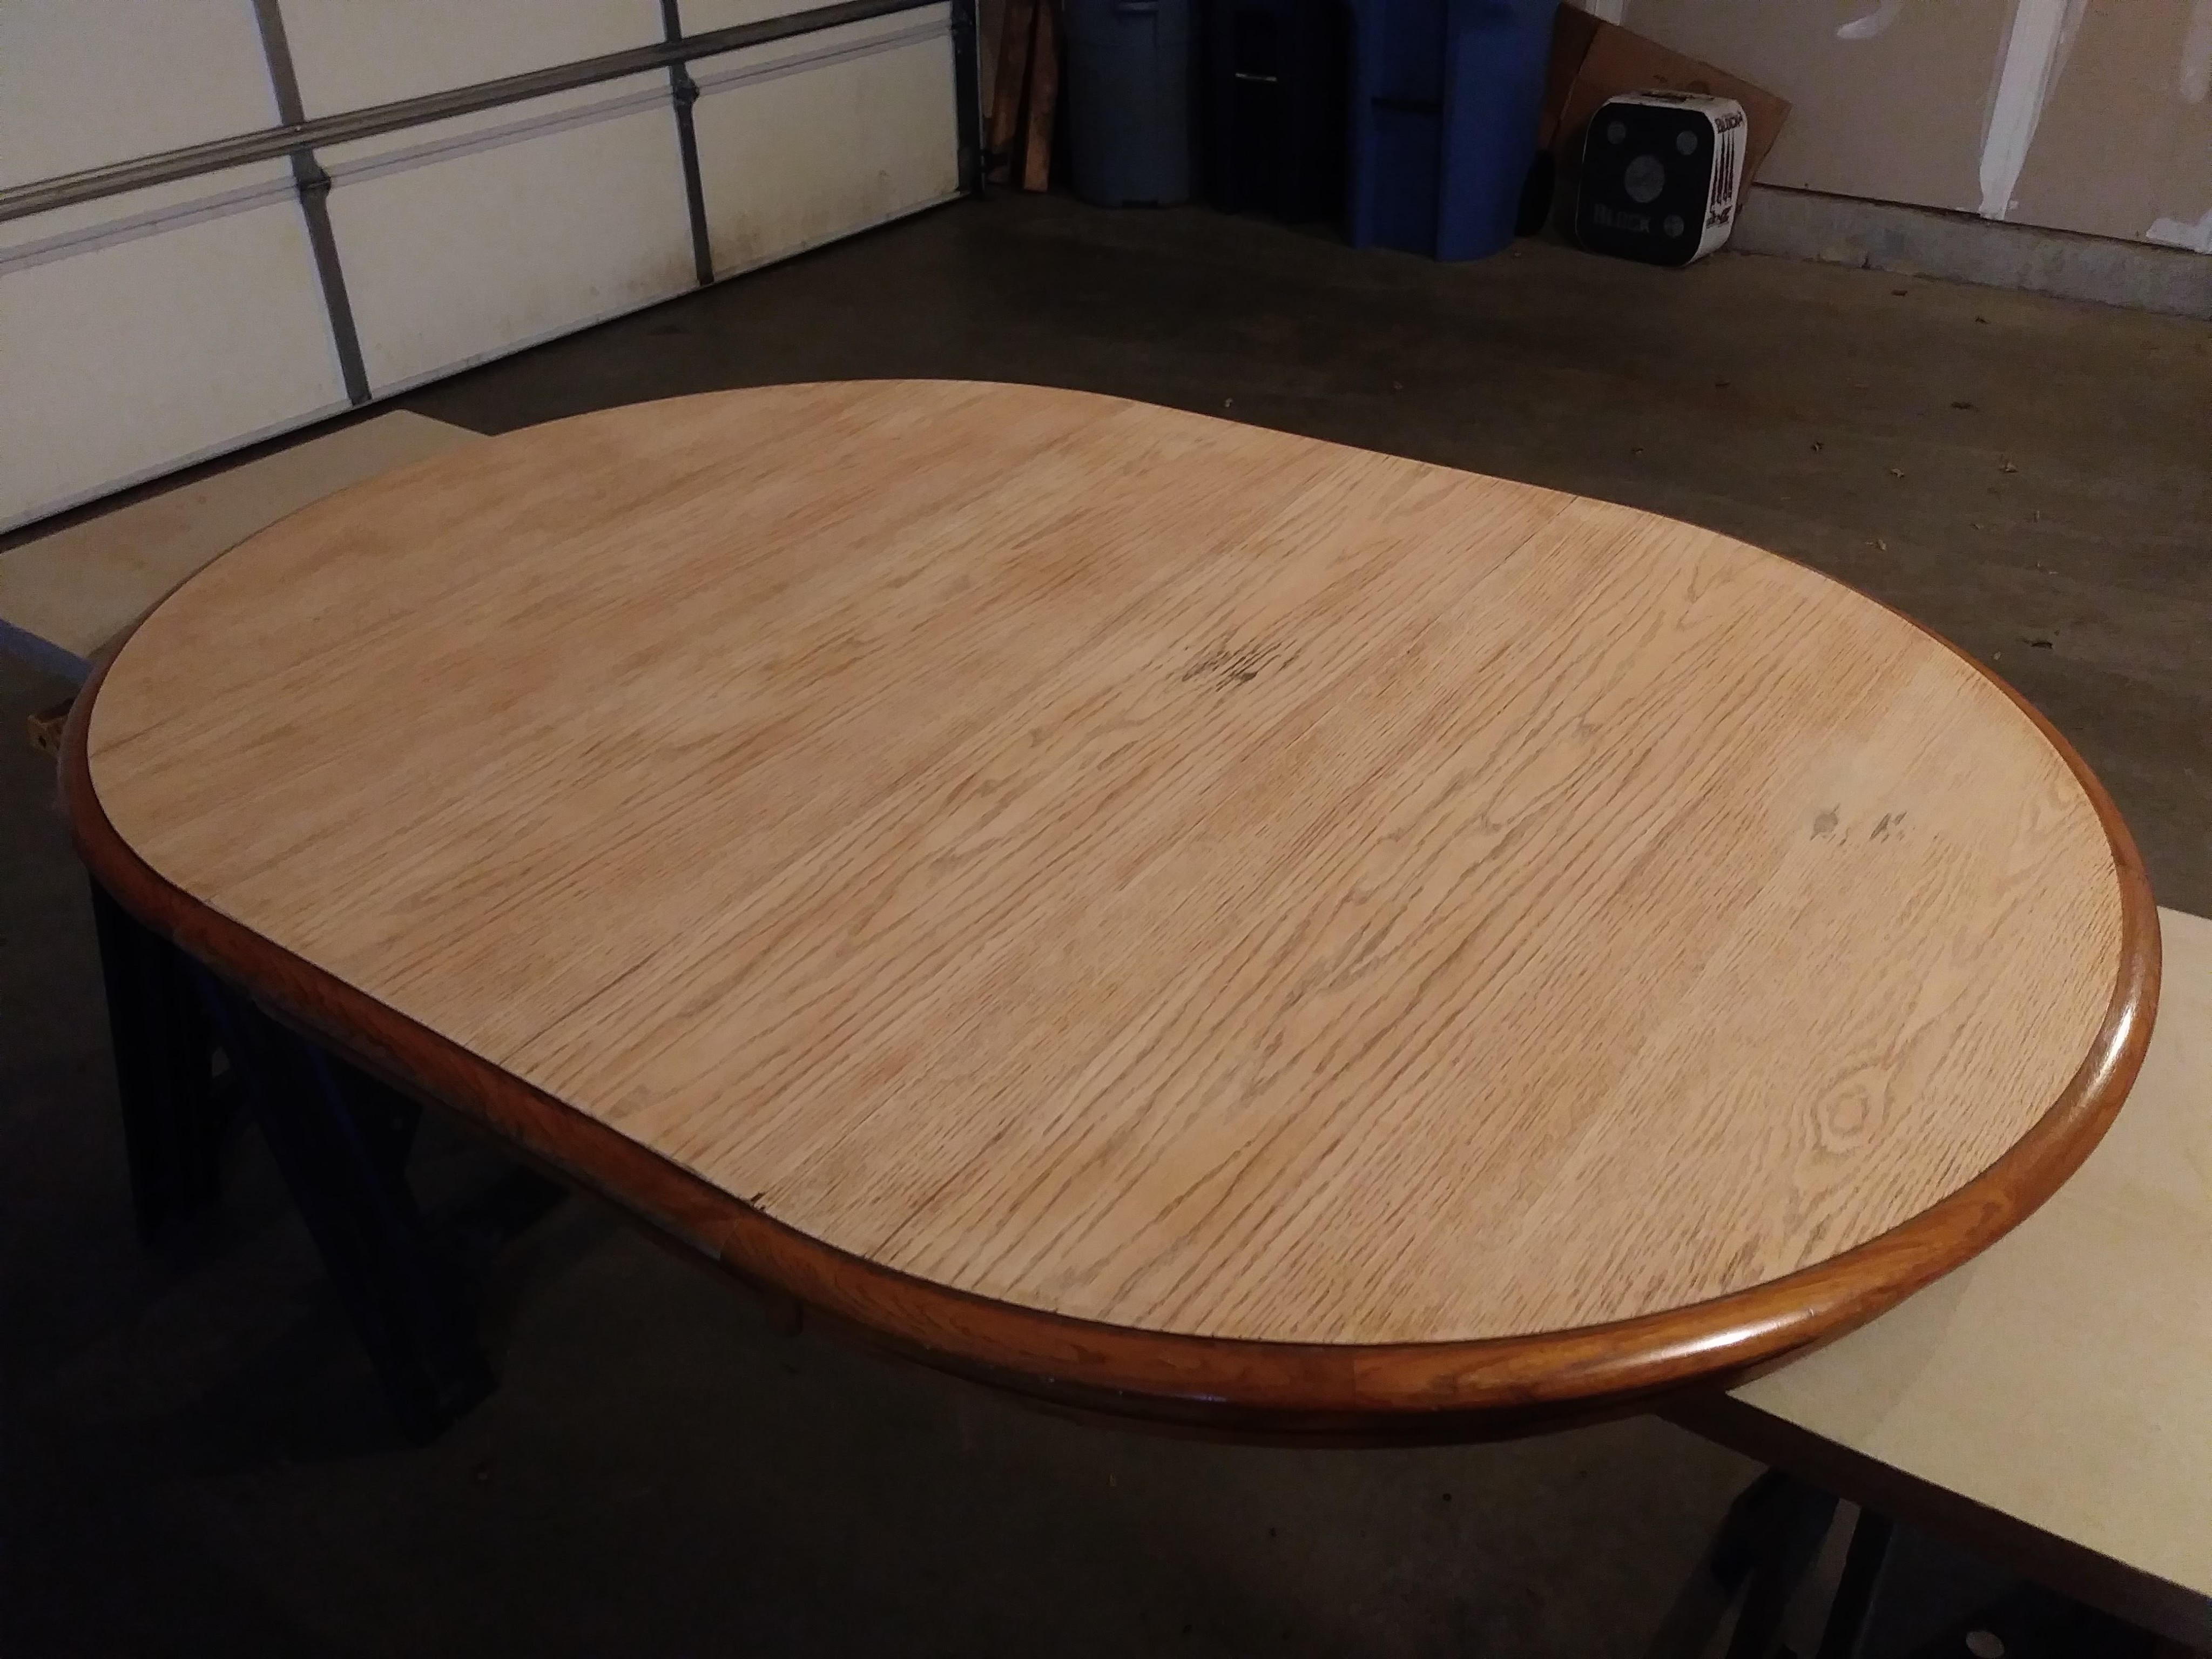
Recently I purchased a couple of tables not really sure if I wanted refinish them and keep them or sell them. Well they are both done being refinished and are up for sale.
The first one is your basic round/oval oak kitchen table with a leaf. I sanded only the top with an orbital sander and refinished it with two coats of an oil based gel stain from General Finishes to match the base and two coats of polyurethane.
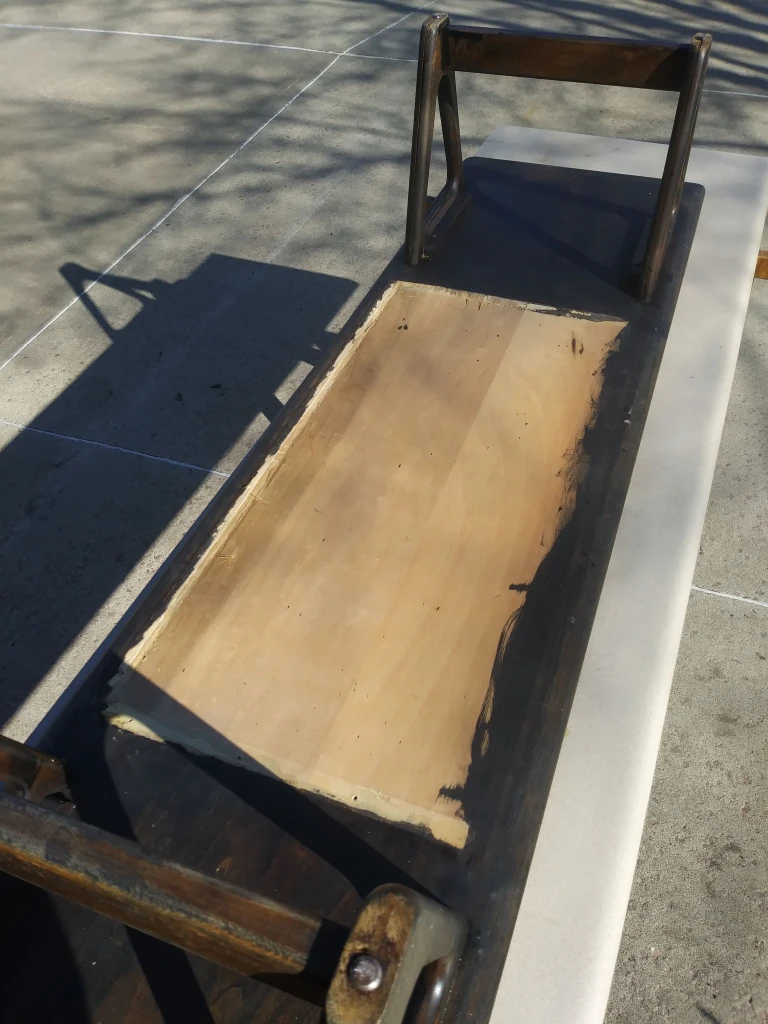
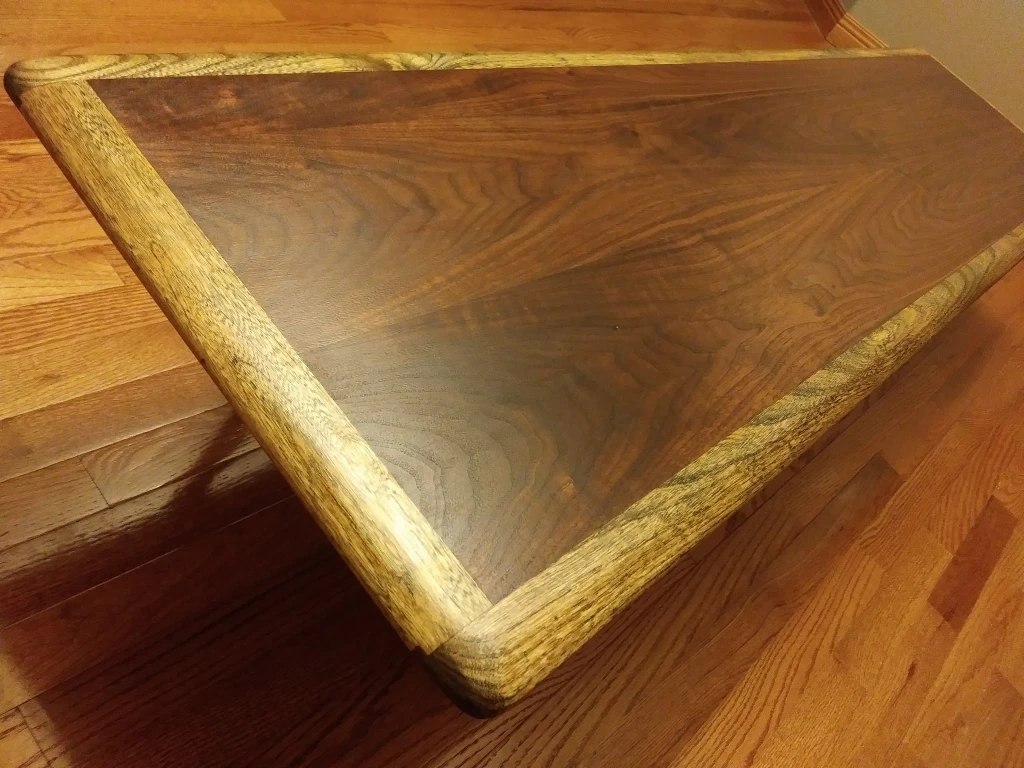
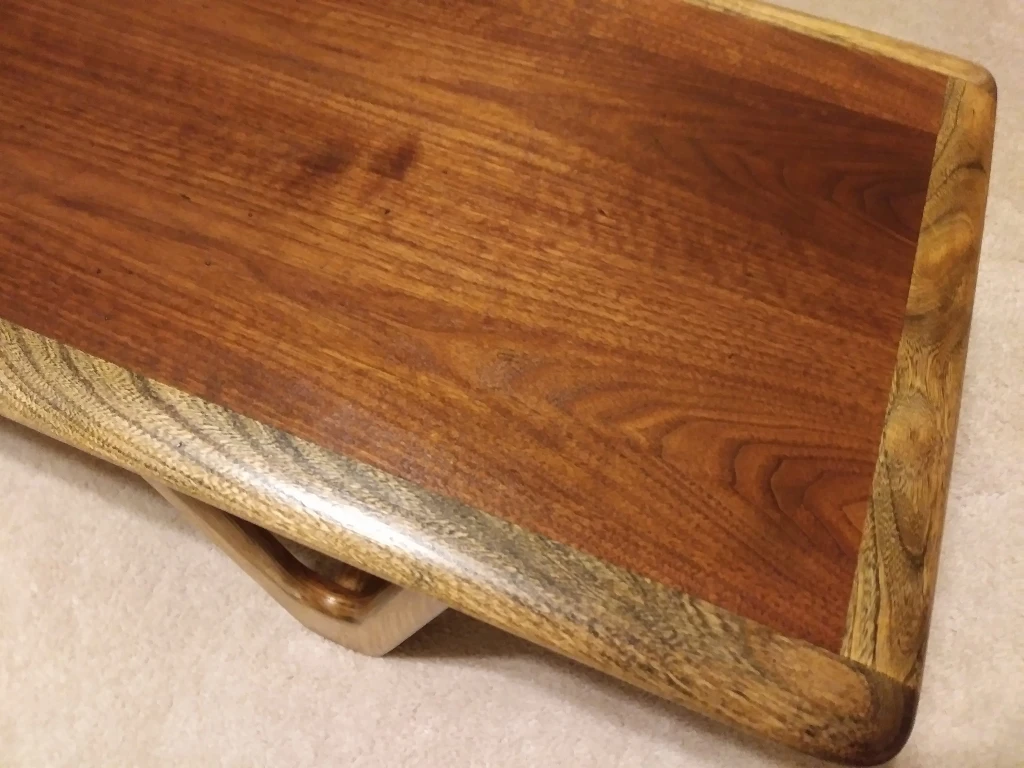
The second table is a little more interesting. It is a mid-century modern Lane Perception coffee table similar to this one. Here is mine as it was when I bought it.
It had a darker stain than I wanted and the thought of removing the stain from the lattice drawer front was daunting. Also, the drawer box itself was damaged. So I opted to completely remove the drawer. Again I took my orbital sander to it.
For this table I went with a three applications of WATCO Danish Oil in light walnut and two coats of polyurethane.
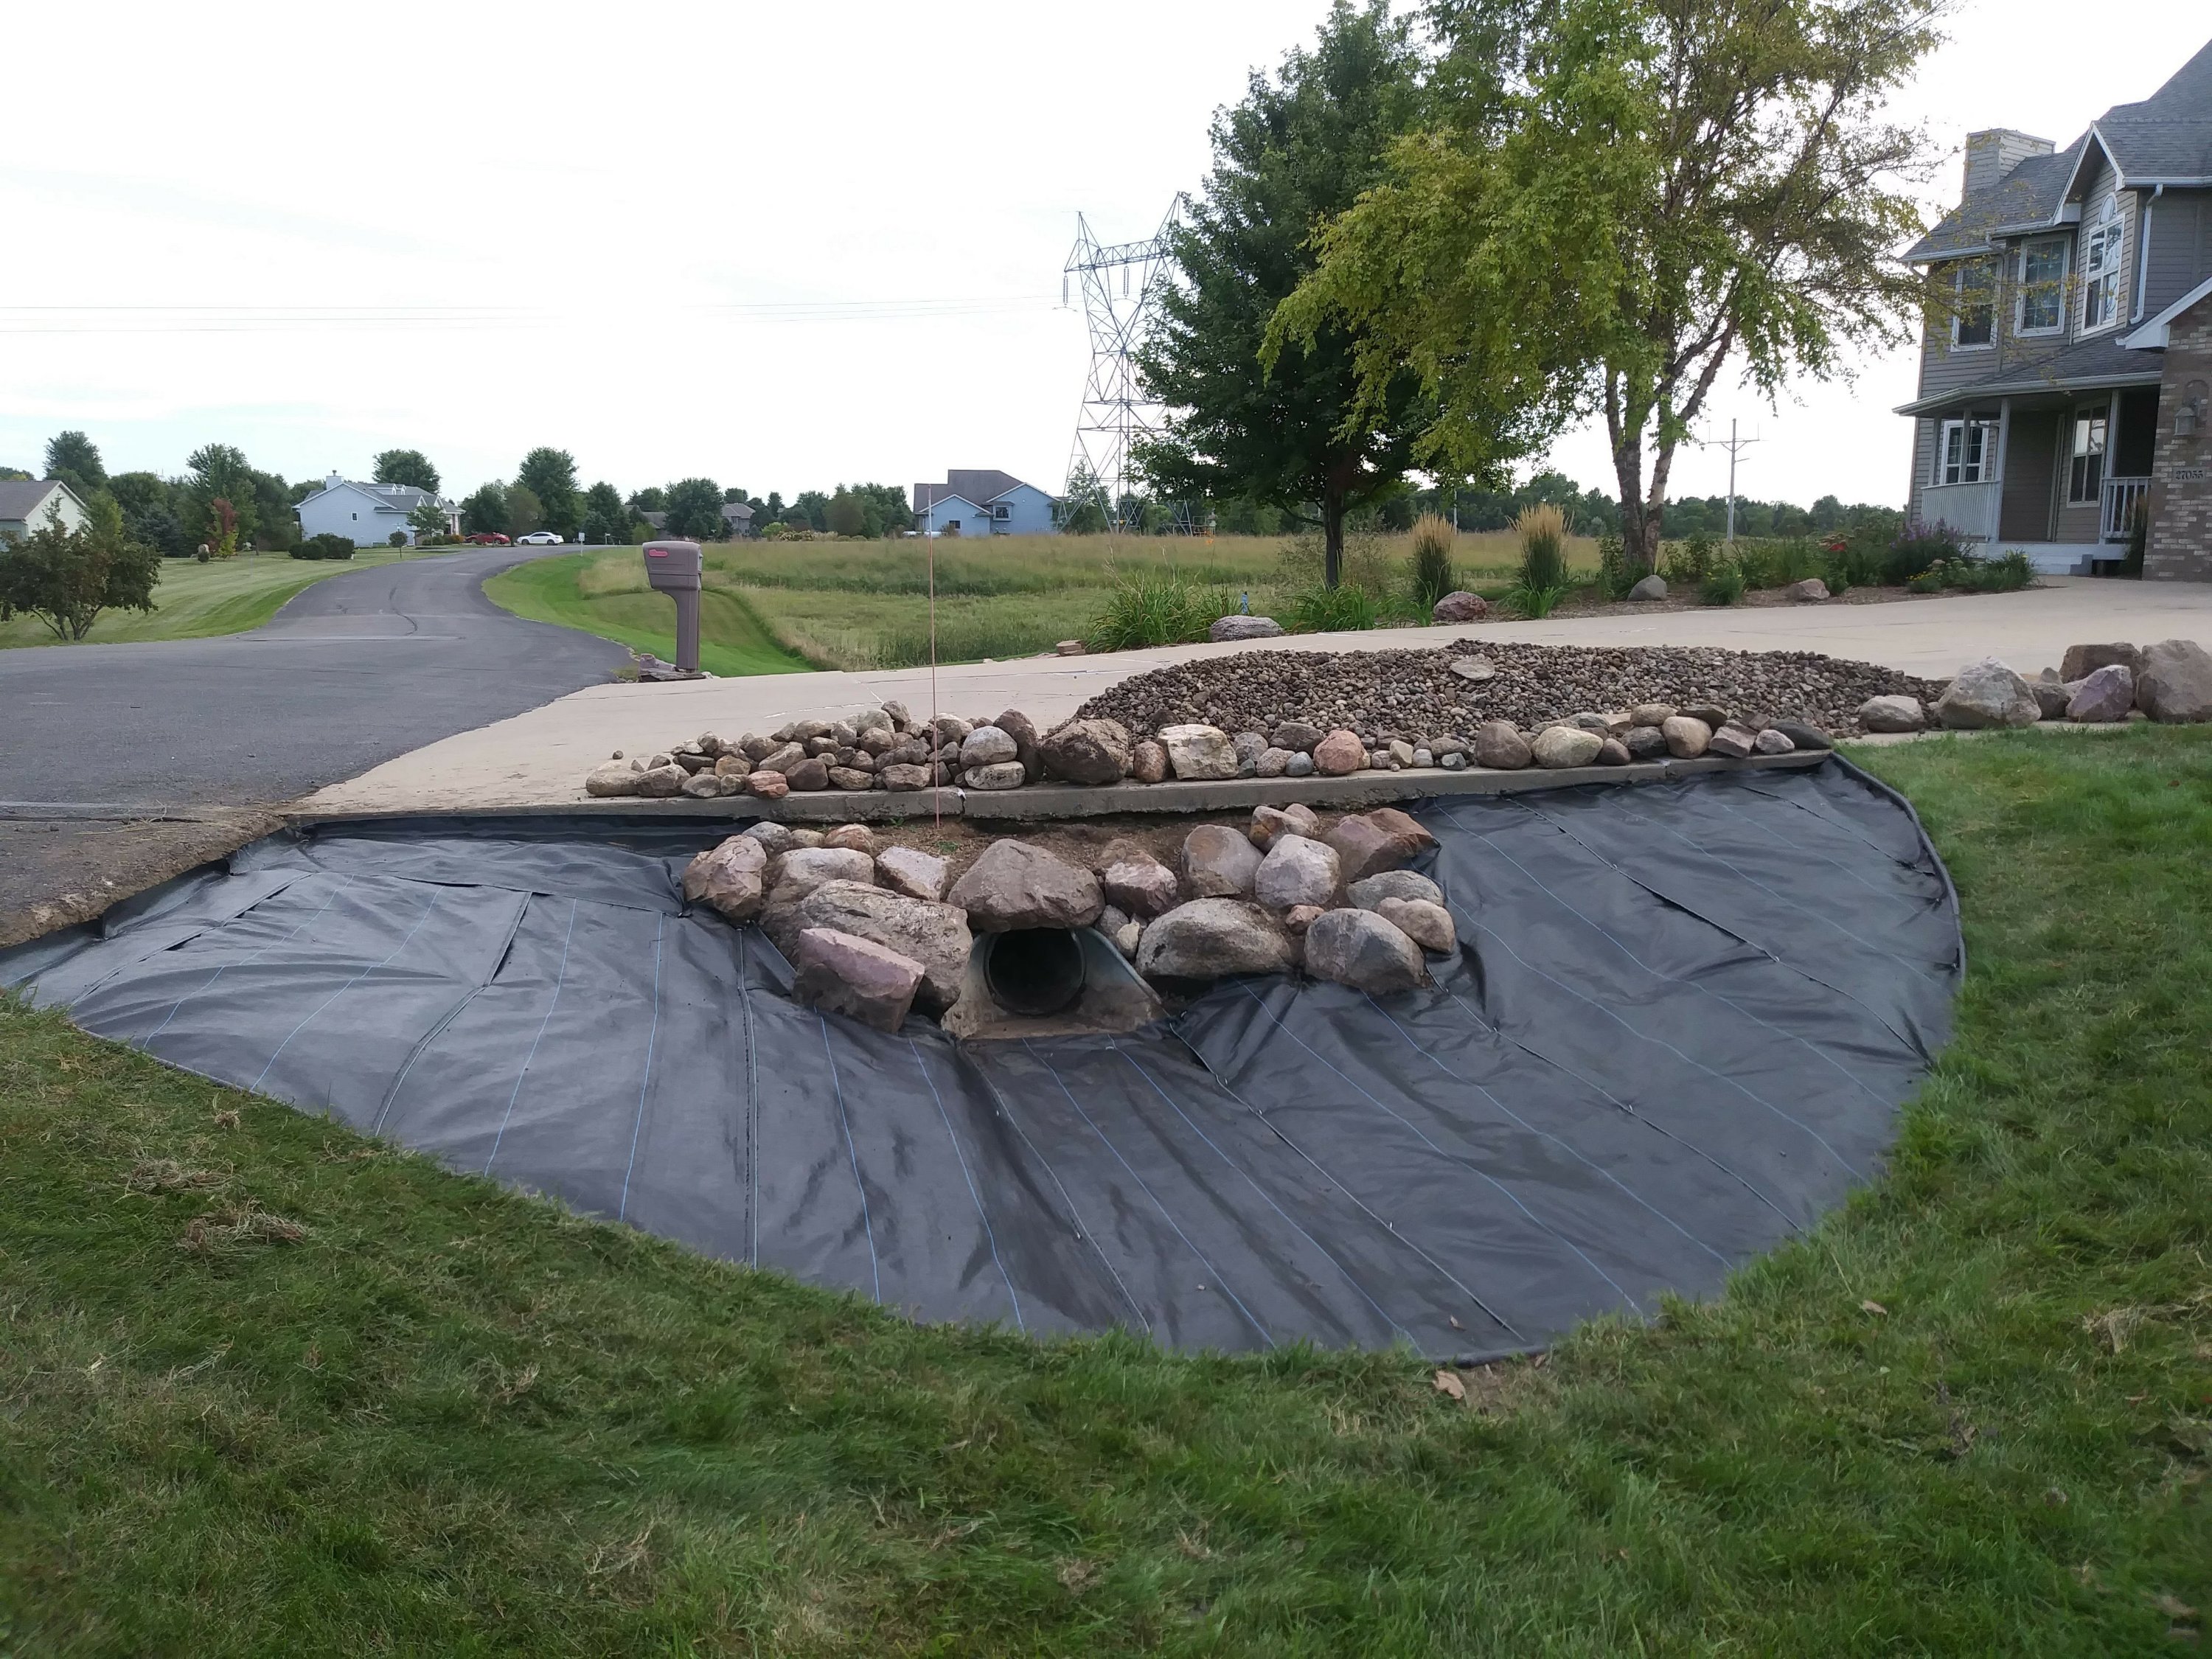
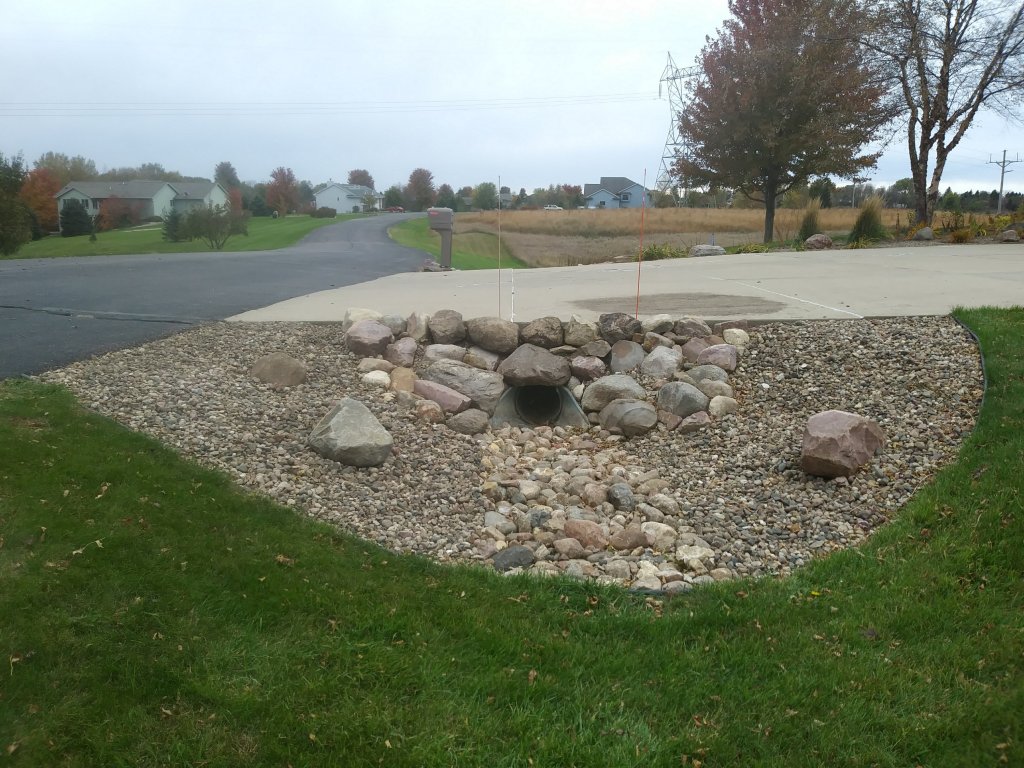
The weeds had started to grow through the landscape fabric in the rocks on the north side of our driveway. Dirt and debris had filled in over the years and was impeding water flow through the culvert. Of course, I neglected to take a photo before we started the reclamation project.
We separated out that dirt and debris with a homemade sifter (heavy gauge 0.25″ screen on and 2.5′ x 4′ wood frame) as we removed the small rocks and placed them on the driveway.
We did not want to just replace the landscape fabric and put back the same rock. Instead we wanted to put some bigger rocks in the channel for better flow and even bigger ones scattered about purely for aesthetics.
On a recent run I had seen some big rocks the size we were looking for in a nearby ditch. We picked those up along with a bunch of smaller ones from a farmer’s field which you can see in the photo above along the edges.
Since we brought in additional rocks we didn’t need all the rocks that were originally there. So I dispersed them in other areas of our landscaping. I think it turned out nicely.
I have had a love-hate relationship with cable TV for a long time, and finally cut the cord about five years ago. We were at the end of a special two year deal with DVR and a whole bunch of channels we never watched. If we kept what we had it was going to cost an extra $50 a month and we decided it was time.
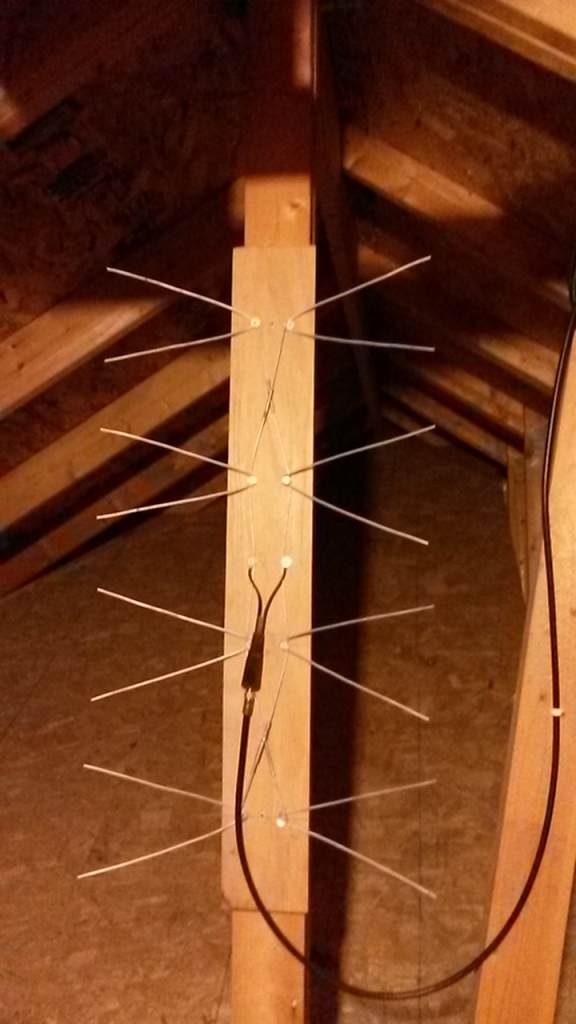
As an alternative we signed up for Netflix and got a Roku to be able to stream to our old TV. In order to pull in over-the-air (OTA) channels I built my own antenna.
I could have purchased an off-the-shelf HD TV antenna, but where is the fun in that? If you search on-line for “DIY TV antenna” you will find a lot of instructions. I built a pretty basic version based on this from Popular Mechanics for less than $20. It pulls in all the local channels with perfect clarity. Here is how mine turned out.
I put it in the attic above our garage and ran coaxial cable to our basement and plugged it in where the line from the cable TV company would go if we had their service. By doing that, we have the OTA signal available throughout the house.
The main drawback of this scenario was being able to watch less and less sports broadcasts. Early rounds of March Madness and the NBA playoffs have moved to cable, as have almost all of the college football bowl games.
Then about a year ago I saw a news story on-line about a new service called Sling TV. For just $20 a month I could get my sports (ESPN, ESPN2, TNT, TBS) as well as a bunch of other channels. There are a number of add-ons you can have if you pay a little more, but we just stuck with the base package.
I waited until March Madness began to start my free seven day trial to test it out. It was awesome! It does freeze occasionally, but overall we think it is a great option for us.
You do need Wi-Fi and some sort of device (Amazon Fire TV, Roku or Chromecast) to stream the content to your TV. You can also download apps to watch on your Android or iOS phone or tablet or even your computer (PC or Mac). We use an Amazon Fire TV Stick which we got on sale for $20. Sling TV does offer deals on various devices. For instance, right now you can get a Roku 2 for free if you pay for three months of service up front. That is a pretty good deal since the Roku 2 is priced at $69.
When we signed up for Sling TV that brought us up to three video streaming services since we previously had Amazon Prime which includes video streaming. Since one of our goals was to save money we decided to discontinue Netflix.
By making a $40 investment in hardware we were able get rid of cable TV and limit our monthly TV expense to just $20. Sometimes I do wonder if we are missing out, but then I go on a business trip and cannot finding anything I want to watch on cable or end up watching 3 hours of a Swamp People marathon which I could have watched on Sling TV anyway.
About a month ago I had new tires put on our 2003 Audi A6 Quattro. It was definitely time. Much better.
The tire shop includes a free alignment with all tires they install. However, they said the ball joints and rubber bushings were so bad they could not do the alignment.
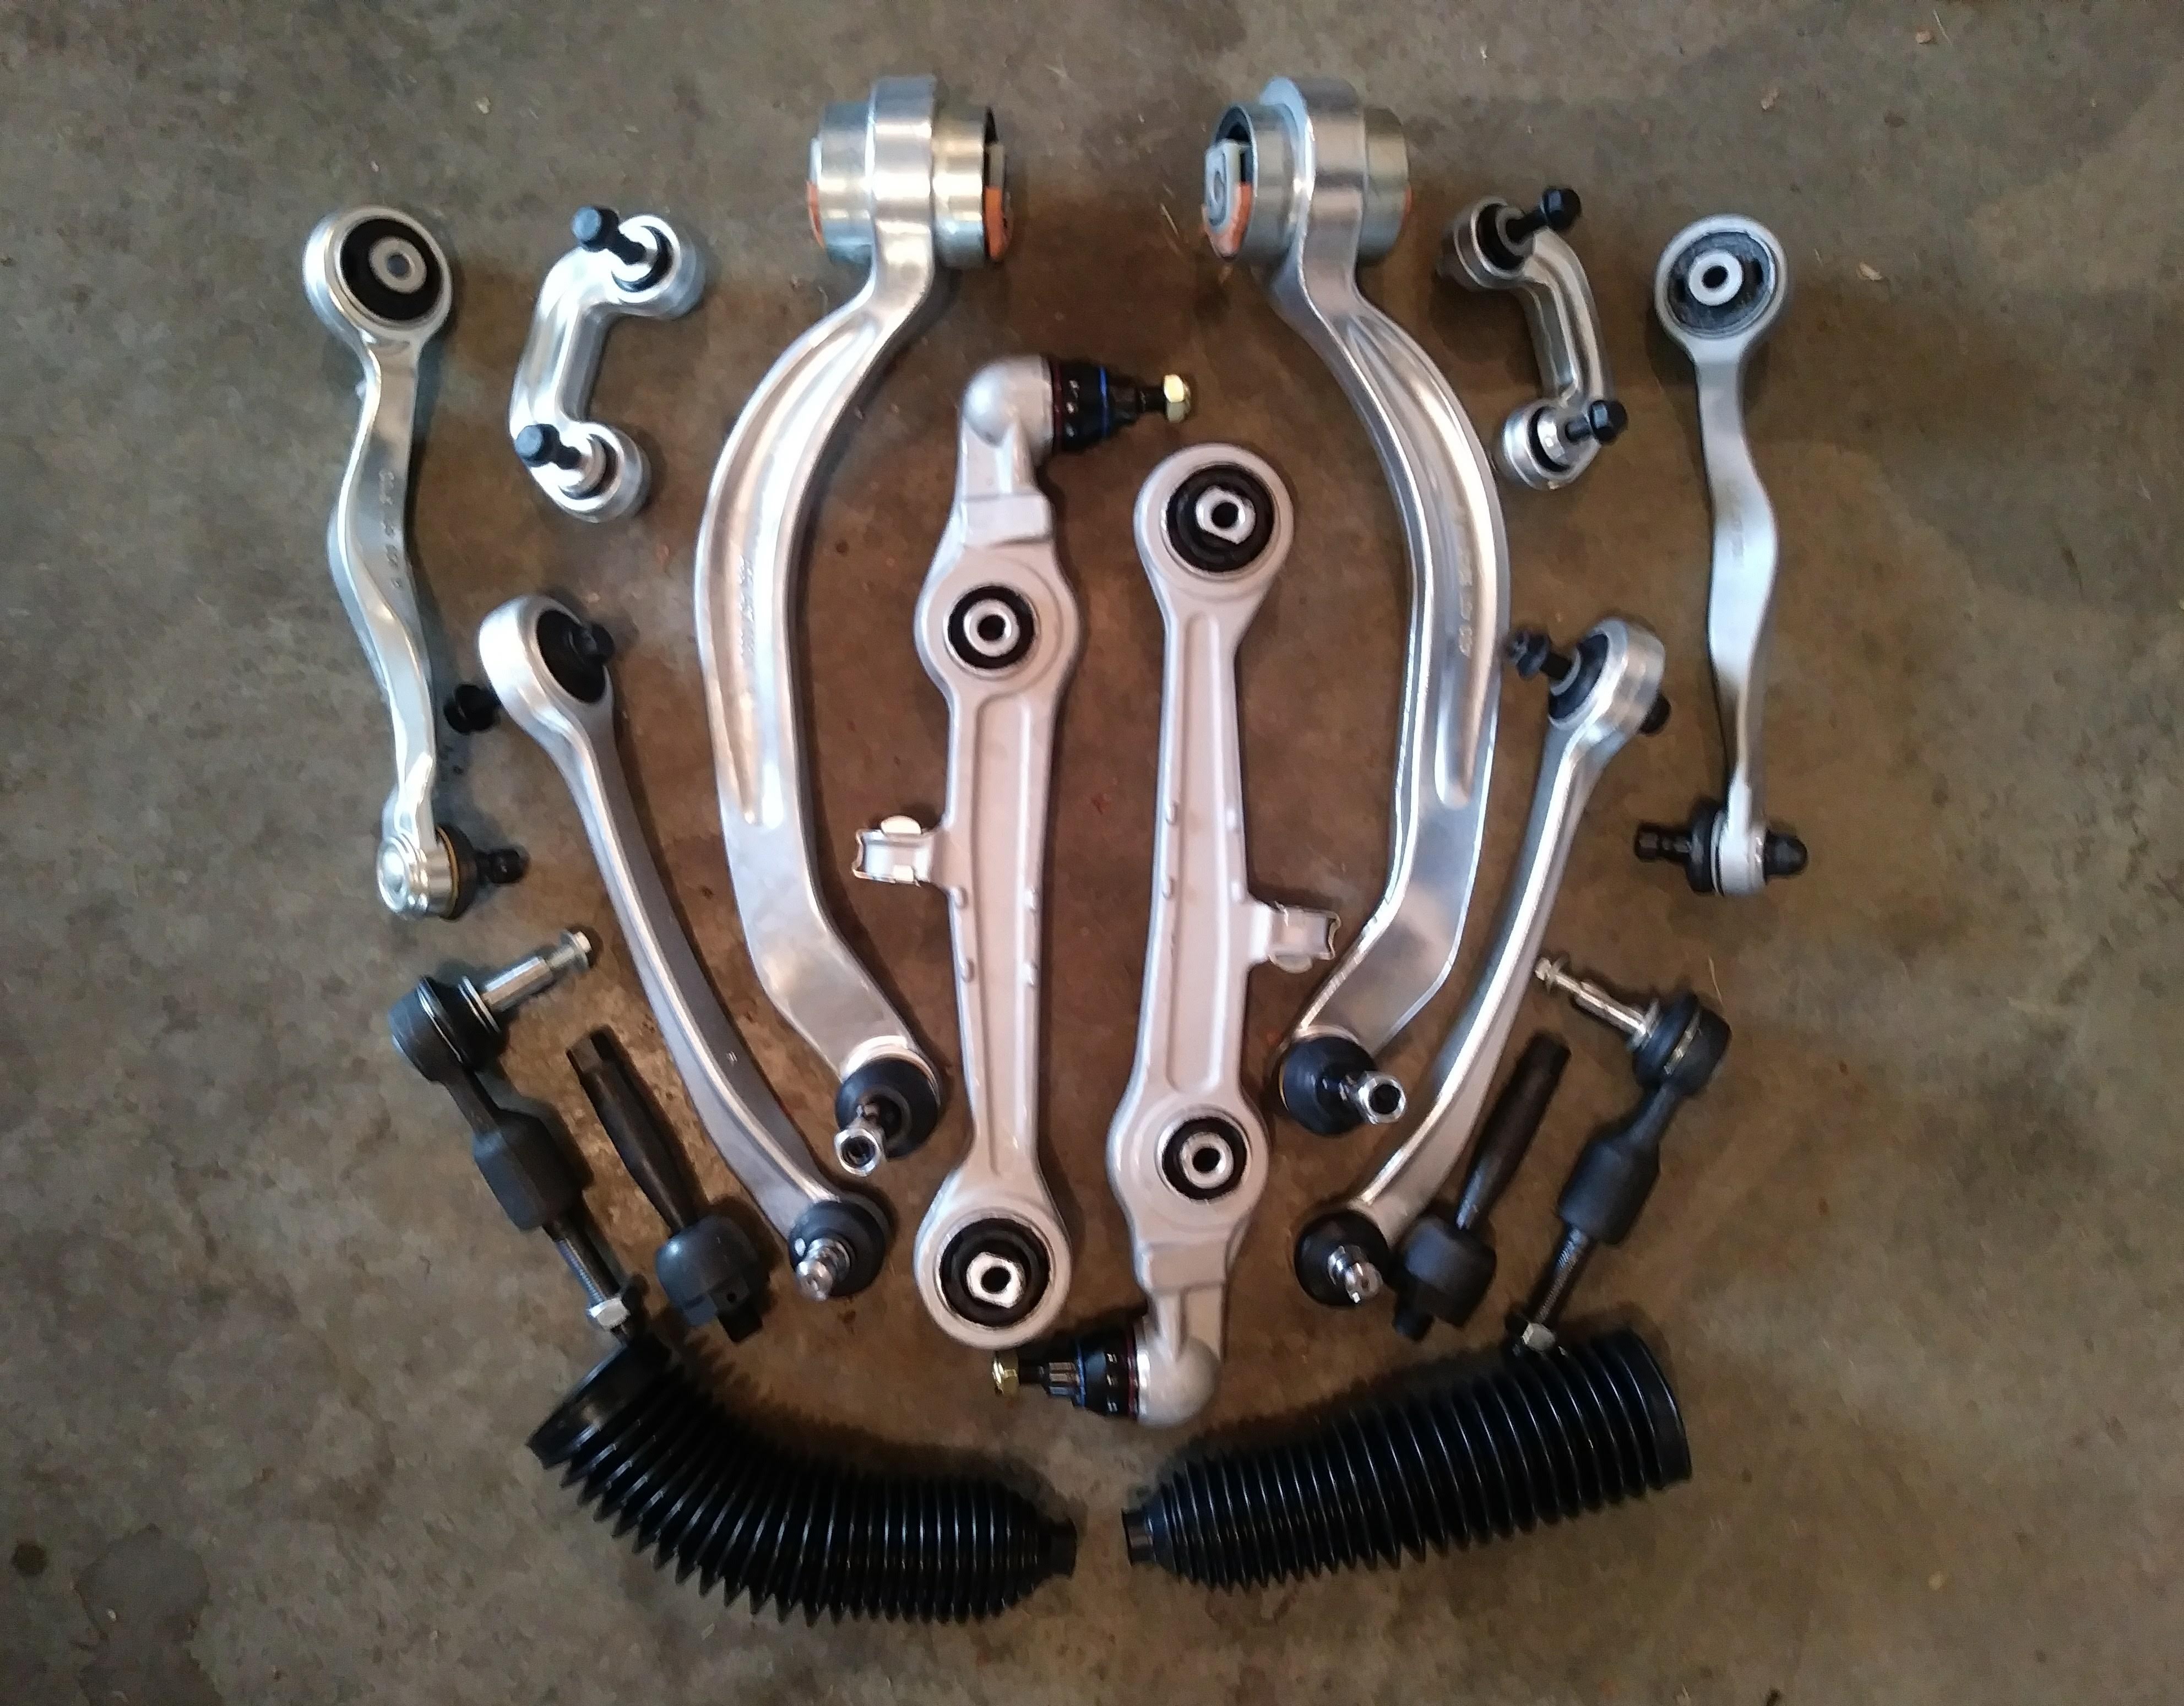
I could have had them do that for me, but I opted to tackle it. After some extensive research and on-line shopping I order a full front-end steering suspension kit minus the shocks and struts.
I started this job on a Saturday morning. I had also taken the following Monday off of work in case it needed some extra time to finish. Did I ever. And then some.
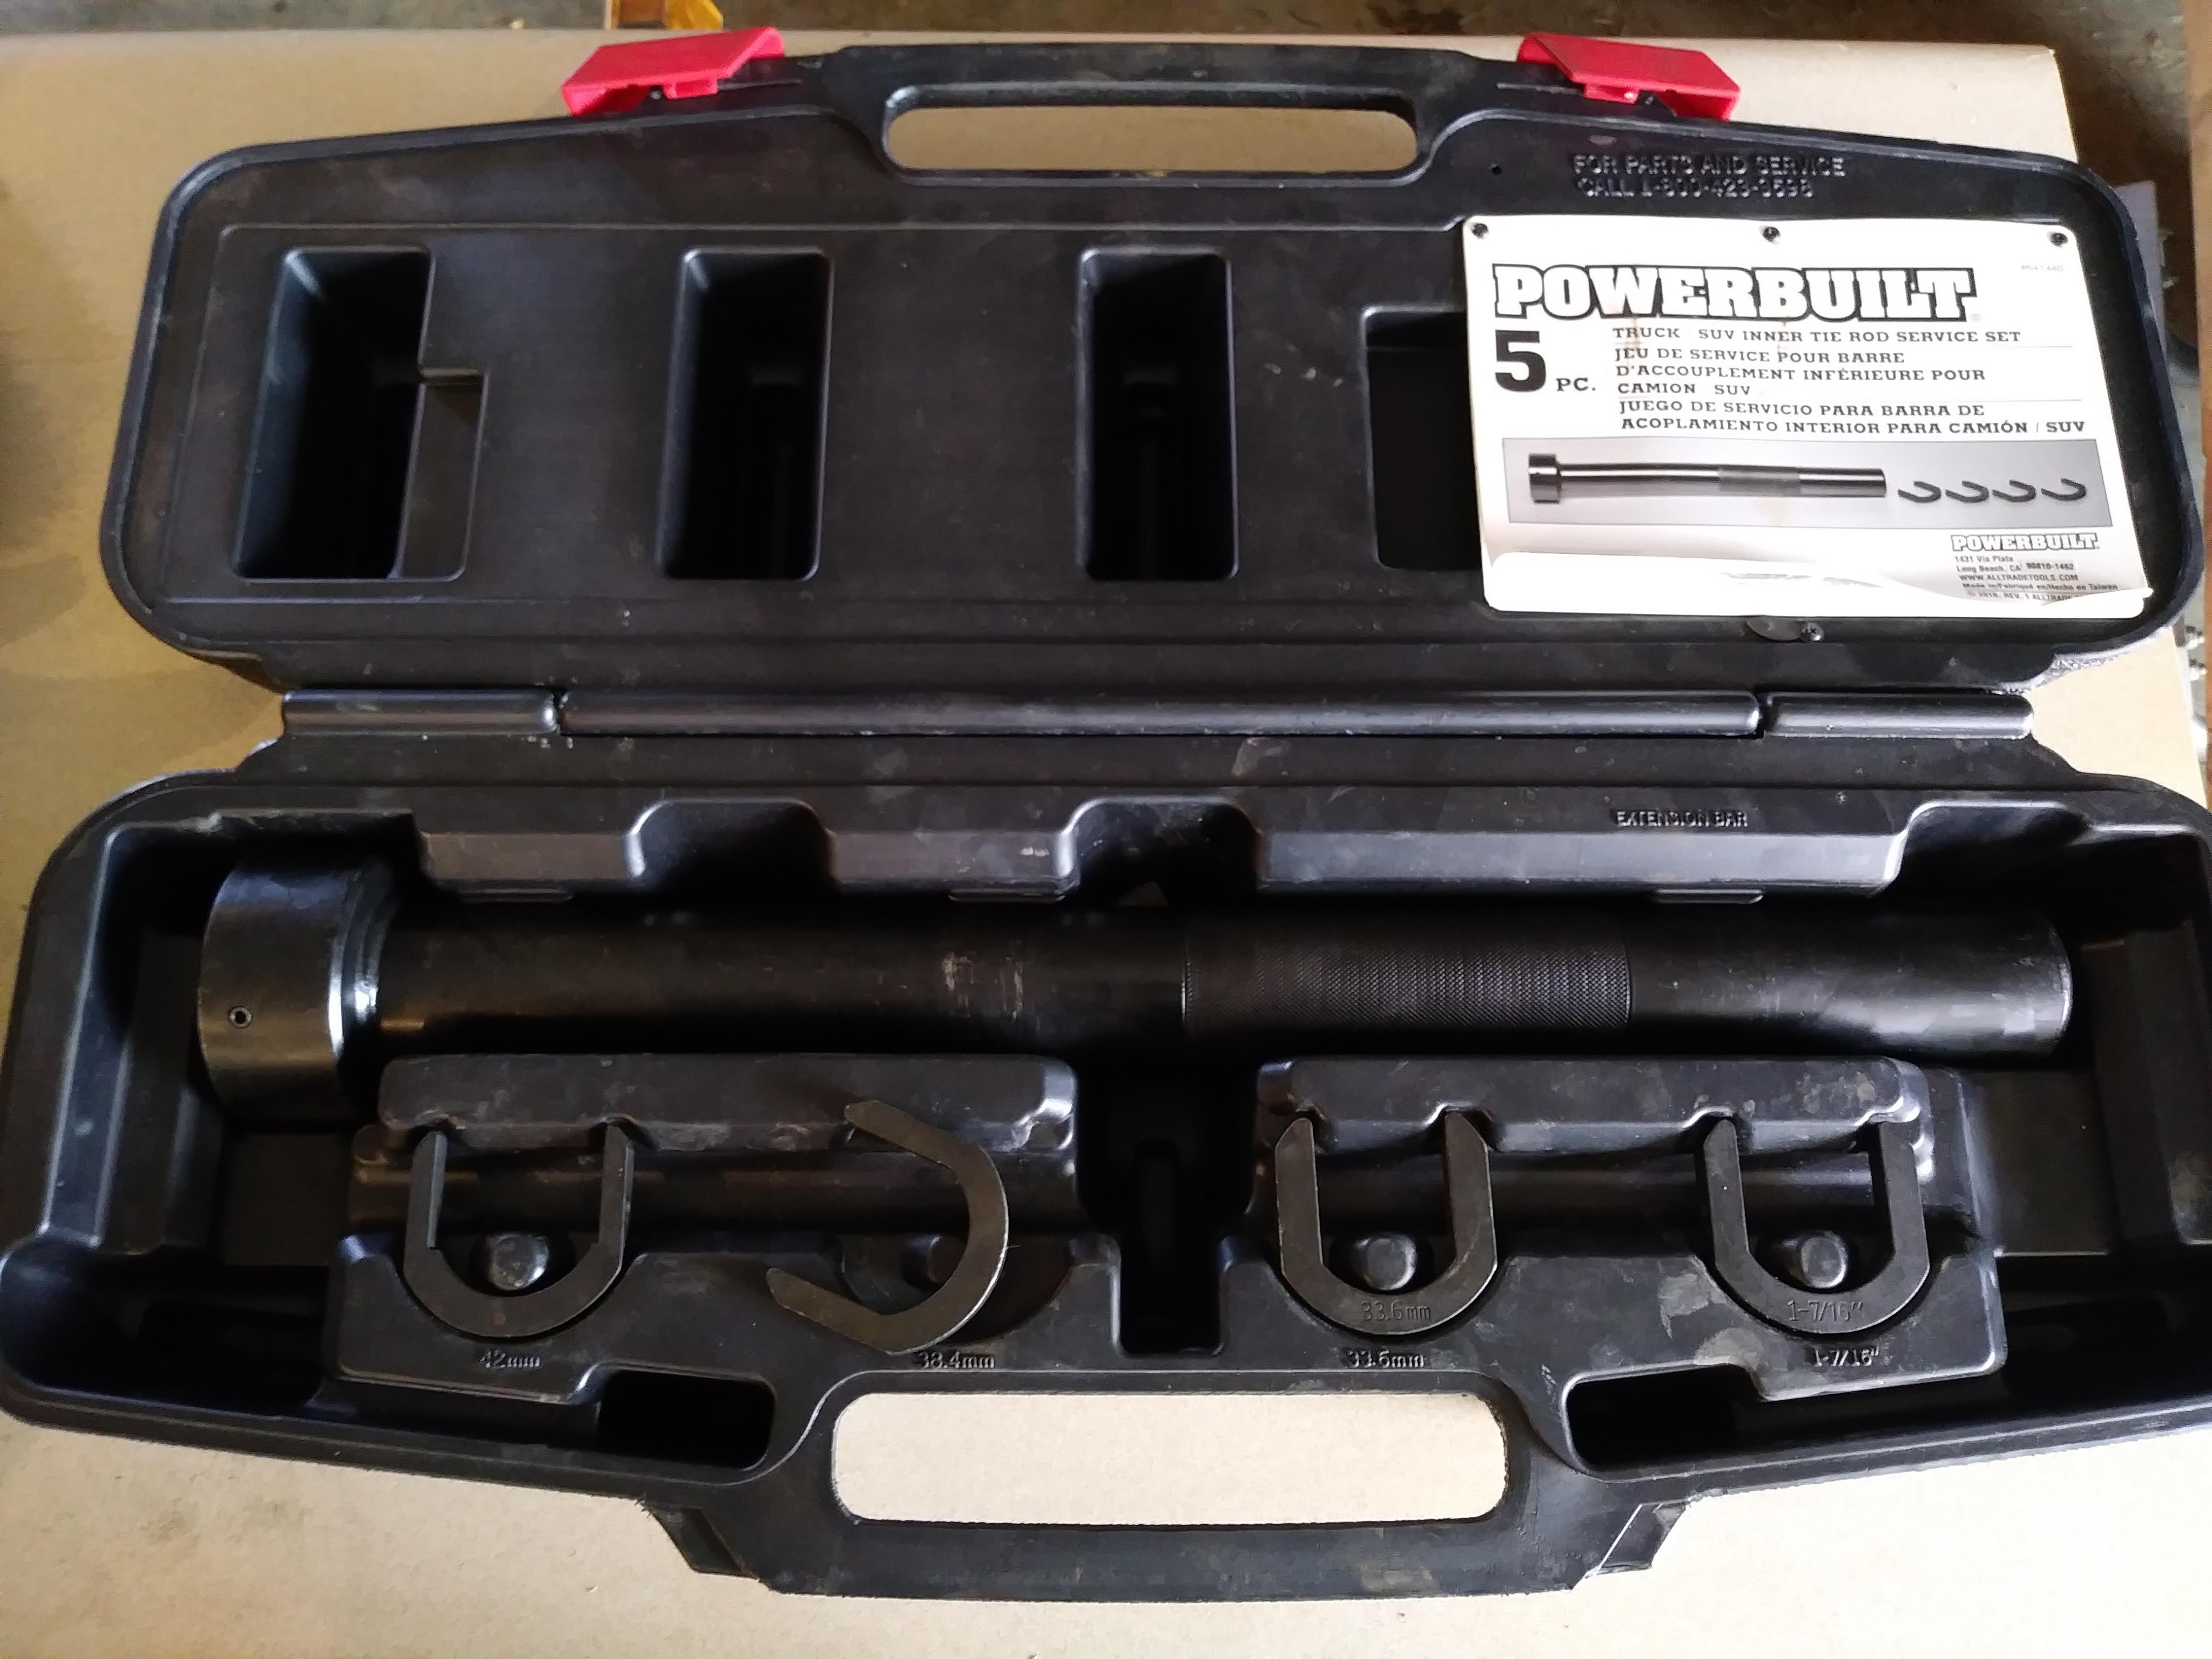
As you would expect there were some rusty nuts that were stubborn. I knew that getting the inner tie rods off would be a challenge so I purchased this special inner tie rod end removal tool.
I was able to get this one off, but I tweaked my shoulder in the process. For the passenger side I went with a different type of tool borrowed from a local auto parts store. Much easier and no additional shoulder pain. I wish I had thought of that at first.
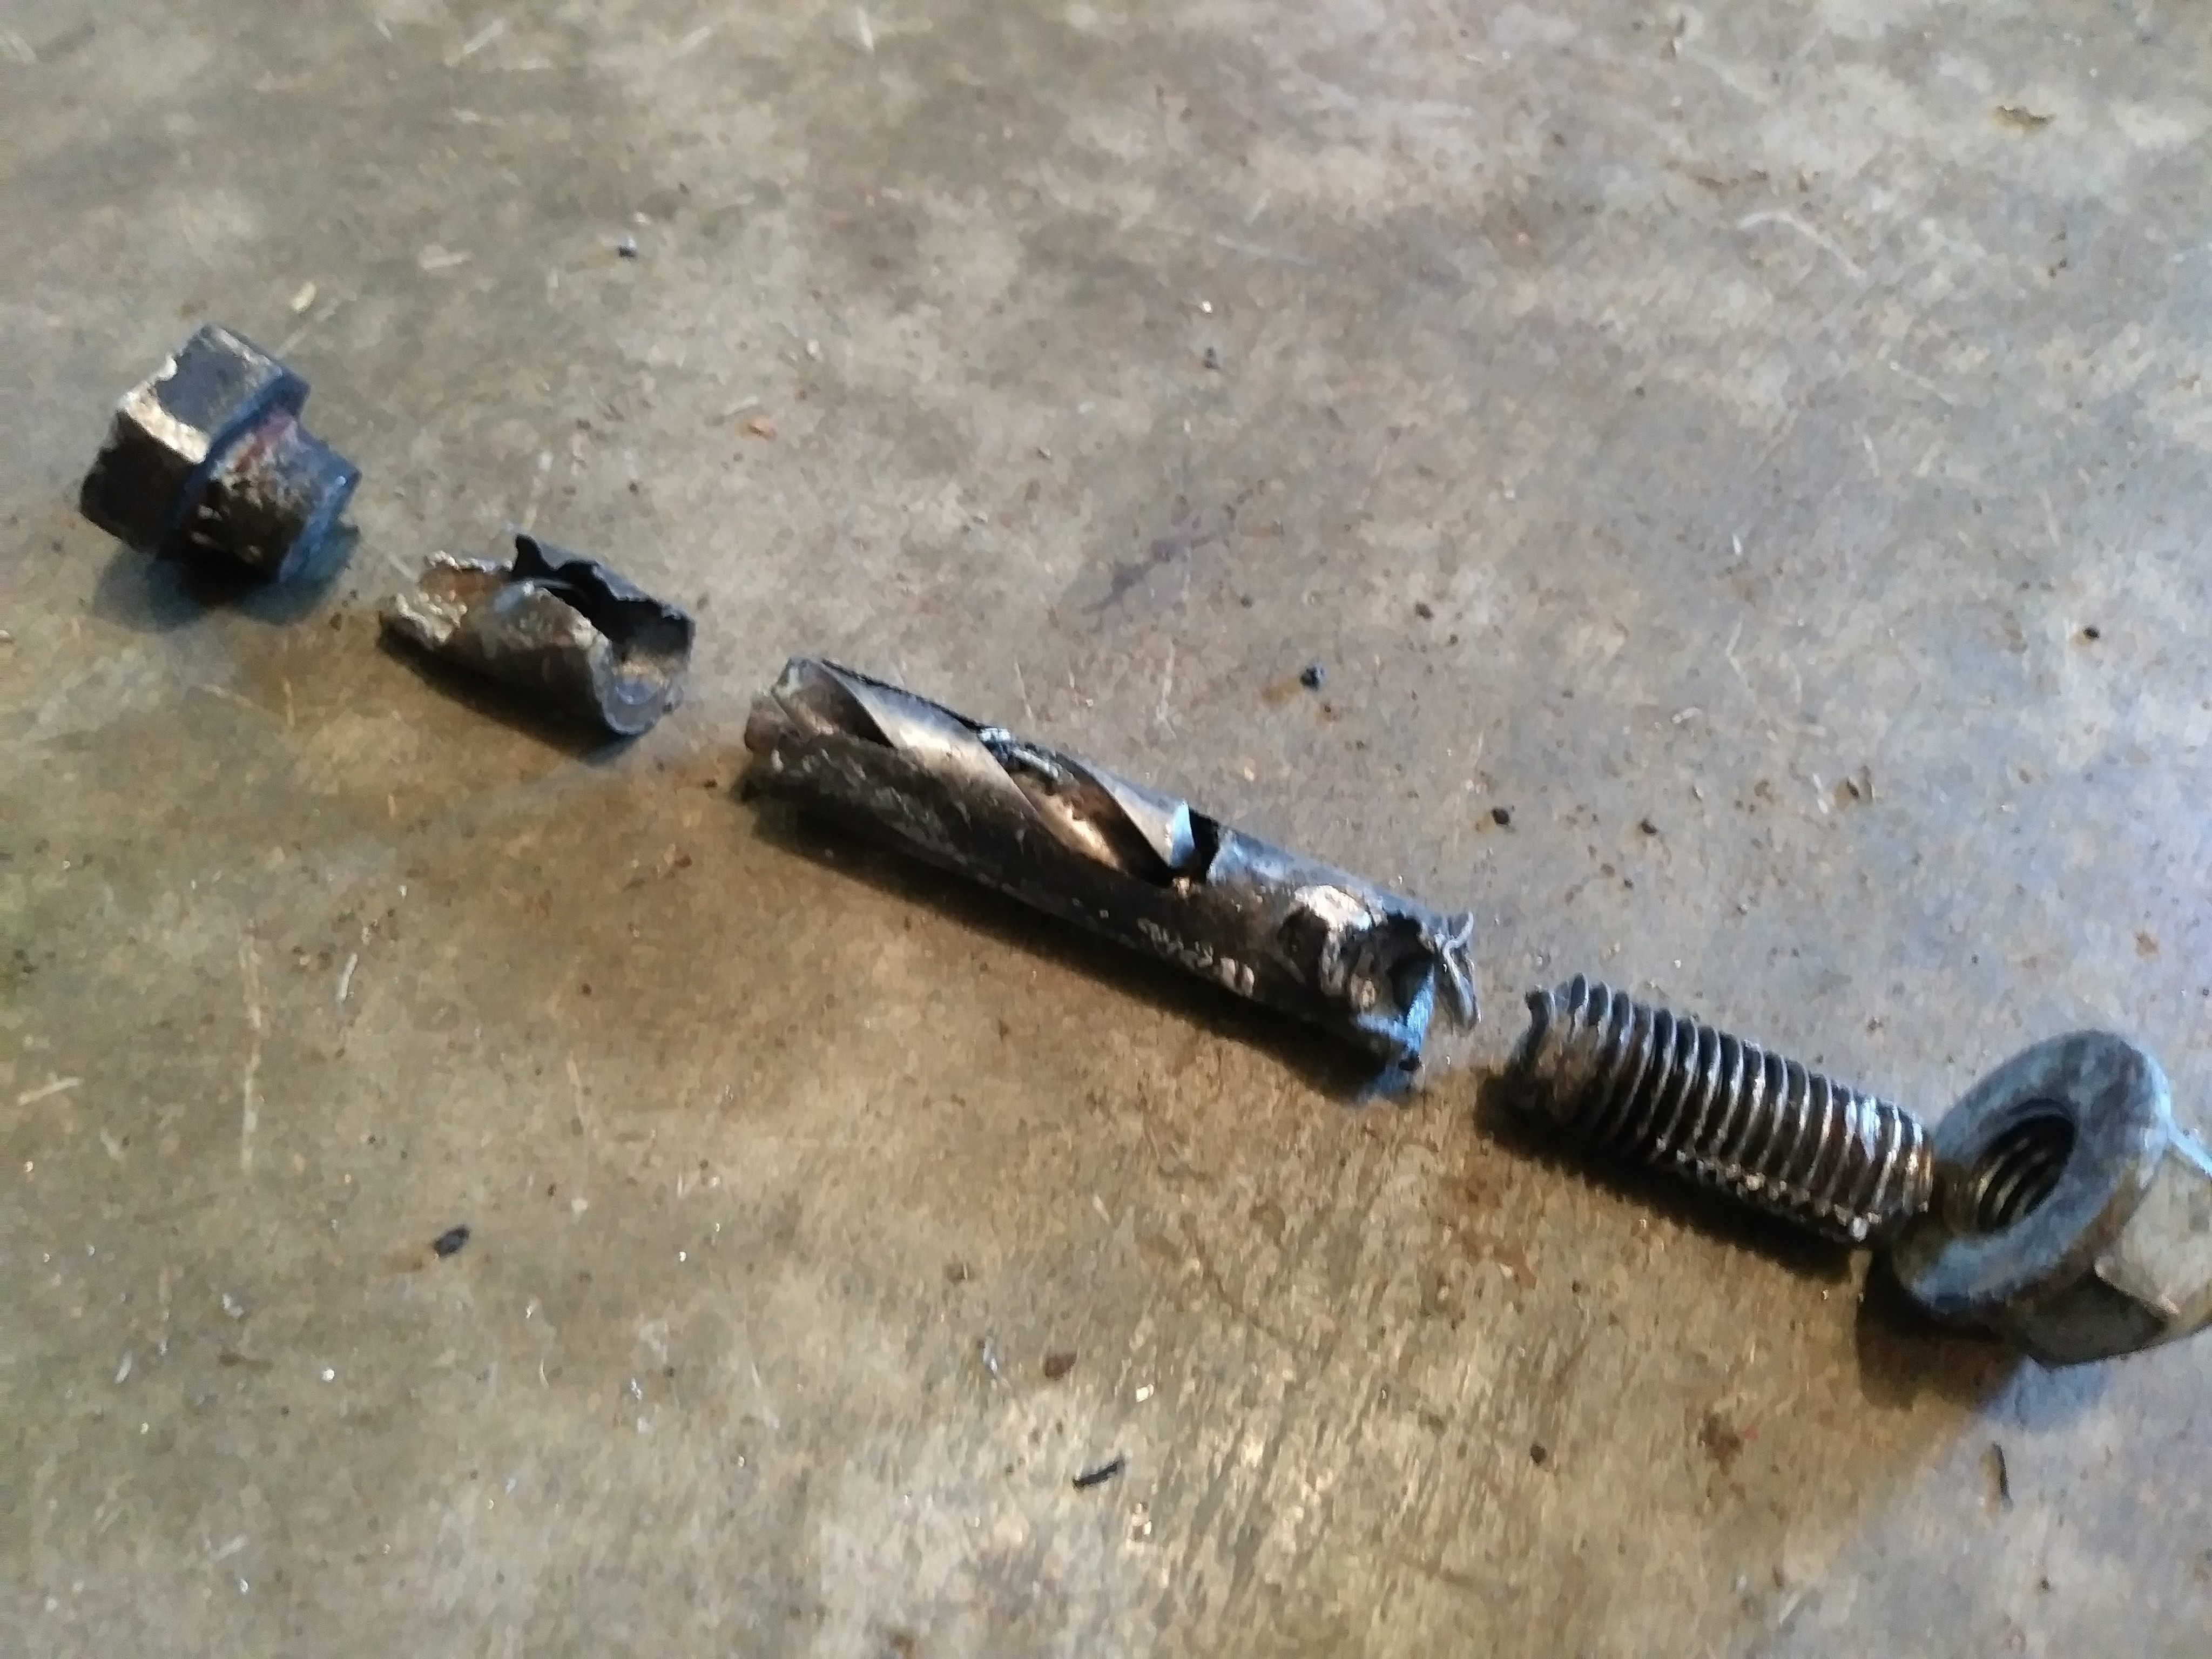
There is a pinch bolt that holds the two upper control arms in place that proved nearly impossible to remove. They were not rusty, just seized up. I twisted the heads off. I used a Dremel, hacksaw, drill, and punch. On the passenger side I had to remove the entire steering knuckle in order to get that bolt out.
To complicate matters, the tie rod boots were the wrong part as were the forward lower control arms. Note the difference in the diameter of the stud just below the threads on the old (left) and new (right) parts.
I am not sure if I was sent the wrong parts or if I order the wrong kit. Everything else fit. I was able to find the forward lower control arms locally and I order the tie rod boots from RockAuto. I went back and forth with the seller about returning the parts, but with the return shipping and 20% restocking fee I did not think it was worth.
As you might have imagined I was not able to finish this job in one weekend. I did finally get things put back together. I took it back to the tire shop for the alignment. I also had them bleed the brakes since introduced air into the brake lines when I removed the steering knuckle.
This was an extremely difficult repair job. I spent 30 hours on this over the course of two weekends and one day off of work. Those stubborn pinch bolts each took 4 hours. My parts and new tool costs were about $400. I think the bill to have a shop do this would have been at least 3 times that. Was it worth it? I am not sure. I am glad it is done and it may be a while before I take on another car repair.